在之前有篇文章介绍了浏览器缓存,如果小伙伴不知道建议去看看传送门。这篇文章 主要介绍nginx作为代理缓存。
1.nginx代理缓存
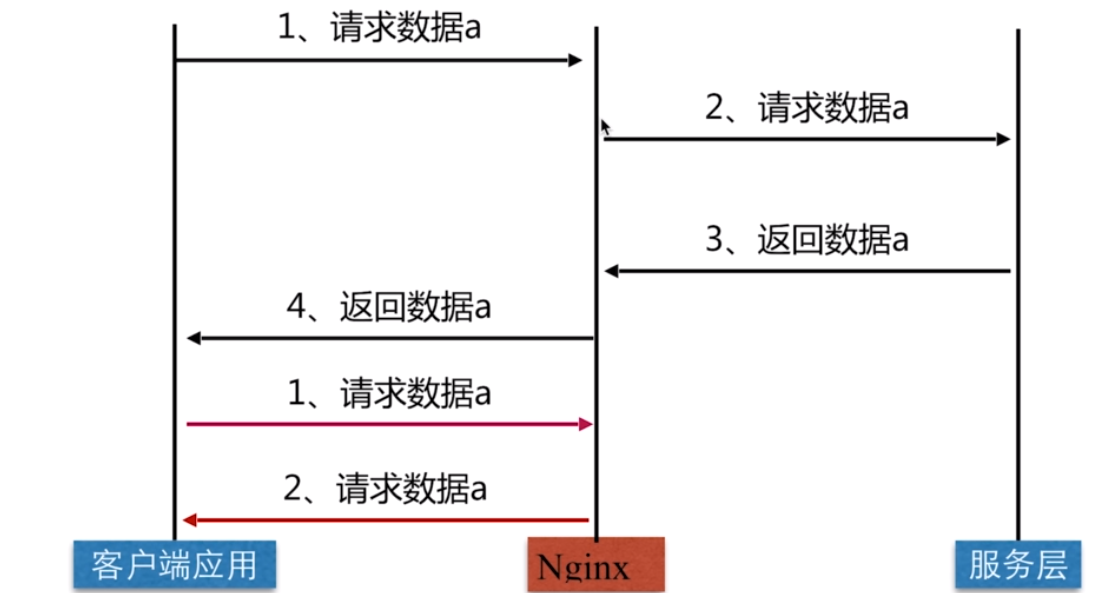
客户端第一次向服务器请求数据,此时nginx没有缓存,nginx会向服务器请求数据,服务器响应请求,nginx会将服务器响应的数据 缓存起来后再向客户端响应,当客户端第二次发送请求时,此时nginx有缓存就不会再向服务器发送请求,而是直接将之前的缓存返回给客户端。这样可以减轻服务器端的压力。
2.代理缓存配置项
1.proxy_cache_path
Syntax:	proxy_cache_path path [levels=levels] [use_temp_path=on|off] keys_zone=name:size [inactive=time]
	[max_size=size] [manager_files=number] [manager_sleep=time] [manager_threshold=time] [loader_files=number]
	[loader_sleep=time] [loader_threshold=time] [purger=on|off] [purger_files=number] [purger_sleep=time] [purger_threshold=time];
Default: —
Context: http
2.proxy_cache_valid
Syntax:	proxy_cache_valid [code ...] time;
Default: —
Context: http, server, location
3.proxy_cache_key
Syntax:	proxy_cache_key string;
Default: proxy_cache_key $scheme$proxy_host$request_uri;
Context: http, server, location
3.缓存场景配置
服务目录
#应用程序
/opt/app
|
|-cache #存放缓存
|-code
   |-index.html
|-code2
   |-index.html
|-code3
   |-index.html

#配置文件
/etc/nginx/conf.d
|
|-cache.conf
|-server1.conf
|-server2.conf
|-server3.conf
index.html(code)
<!doctype html>
<html lang="en">
<head>
	<meta charset="UTF-8">
	<title>Document</title>
</head>
<body>

<h1>欢迎来到瓦力博客</h1>

</body>
</html>
index.html(code2)
<!doctype html>
<html lang="en">
<head>
	<meta charset="UTF-8">
	<title>Document</title>
</head>
<body>

<h1>这个是code2</h1>

</body>
</html>
index.html(code3)
<!doctype html>
<html lang="en">
<head>
	<meta charset="UTF-8">
	<title>Document</title>
</head>
<body>

<h1>这个是code3</h1>

</body>
</html>
cache.conf
upstream wali {
    server 127.0.0.1:8001;
    server 127.0.0.1:8002;
    server 127.0.0.1:8003;
}

#proxy_cache_path 设置路径
#levels 设置目录级别
#keys_zone=wali_cache:10m 定义名字wali_cache大小10M
#max_size=10g 缓存最大10G
#inactive=60m 表示60分钟内如果没有被访问过就清掉
proxy_cache_path /opt/app/cache levels=1:2 keys_zone=wali_cache:10m max_size=10g inactive=60m use_temp_path=off;

server {
    listen       80;
    server_name  localhost;

    #charset koi8-r;
    access_log  /var/log/nginx/host.access.log  main;

    location / {
      proxy_cache wali_cache;  #开启缓存 off关闭缓存
      proxy_pass http://wali;
      proxy_cache_valid 200 304 12h;  #表示对200 304头信息12小时过期
      proxy_cache_valid any 10m;      #表示除200 304头信息10钟过期
      proxy_cache_key $host$uri$is_args$args;  #设置缓存的key
      add_header Nginx-Cache "$upstream_cache_status";  #添加一个头信息,告知客户端是否命中缓存

	  #当返回的头信息中有500,502,503,504就跳过当前访问下一台服务器
      proxy_next_upstream error timeout invalid_header http_500 http_502 http_503 http_504;
      include proxy_params; #导入常用的代理配置在上一节中写到过
    }

}
server1.conf
server {
    listen       8001;
    server_name  localhost;

    #charset koi8-r;
    #access_log  /var/log/nginx/host.access.log  main;

    location / {
        root   /opt/app/code;
        index  index.html index.htm;
    }
}
server2.conf
server {
    listen       8002;
    server_name  localhost;

    #charset koi8-r;
    #access_log  /var/log/nginx/host.access.log  main;

    location / {
        root   /opt/app/code2;
        index  index.html index.htm;
    }
}
server3.conf
server {
    listen       8003;
    server_name  localhost;

    #charset koi8-r;
    #access_log  /var/log/nginx/host.access.log  main;

    location / {
        root   /opt/app/code3;
        index  index.html index.htm;
    }
}
检测语法重启服务
nginx -tc /etc/nginx/conf

nginx -s reload -c /etc/nginx/conf
关闭代理缓存
为了更直观的看到效果,将cache.conf文件修改,然后重启服务
打开控制台,勾选Disable cache禁用掉缓存,F5刷新。就会看到内容不停在变。
打开代理缓存
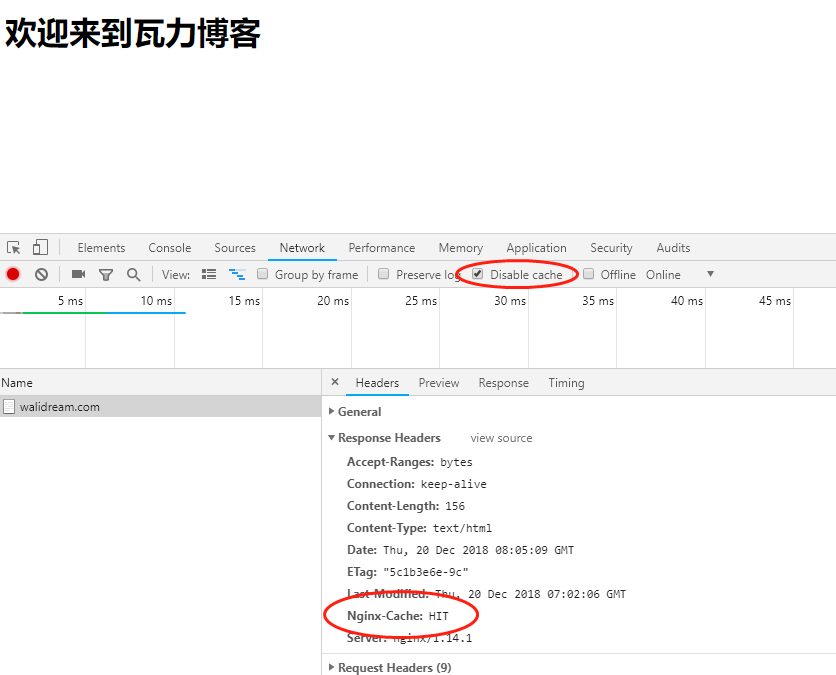
打开控制台,勾选Disable cache禁用掉缓存,F5刷新。发现内容不会变。头信息中多了Nginx-Cache值为HIT表示命中缓存,同时在/opt/app/cache目录下面也会出现缓存文件。
4.清理指定代理缓存
proxy_no_cache
Syntax:	proxy_no_cache string ...;
Default: —
Context: http, server, location
示例配置
server {
    listen       80;
    server_name  localhost;

    #charset koi8-r;
    access_log  /var/log/nginx/host.access.log  main;

	if ( $request_uri ~ ^/(url3|login|register|password)) {
		set $cookie_nocache 1;
	}

    location / {
      proxy_cache wali_cache;
      proxy_pass http://wali;
      proxy_cache_valid 200 304 12h;
      proxy_cache_valid any 10m;
      proxy_cache_key $host$uri$is_args$args;
	  proxy_no_cache $cookie_nocache $arg_nocache $arg_comment;
	  proxy_no_cache $http_pragma $http_authorization;
      add_header Nginx-Cache "$upstream_cache_status";

      proxy_next_upstream error timeout invalid_header http_500 http_502 http_503 http_504;
      include proxy_params; #导入常用的代理配置在上一节中写到过
    }

}
proxy_no_cache配置项后面跟着的string,如果匹配到就不会去缓存。这里设置如果匹配/(url3|login|register|password)就不会被缓存。
还有一个插件ngx_cache_purge,可以指定哪些url不会被缓存。感兴趣的小伙伴可以试试
5.缓存命中率分析
$upstream_cache_status
| 状态 | 含义 |
|---|
| MISS | 未命中,请求被传送到后台处理 |
| HIT | 缓存命中 |
| EXPIRED | 缓存已经过期,请求被传送到后台处理 |
| UPDATING | 正在更新缓存,将使用旧的应答 |
| STALE | 后端得到过期的应答 |
缓存命中率
用日志分析代理缓存的命中率需要用到awk命令,如果不熟悉awk命令传送门。
打开缓存配置文件
vim /etc/nginx/conf.d/cache.conf
查找到日志存放在哪里,这里是存放在/var/log/nginx/host.access.log,日志格式main
access_log /var/log/nginx/host.access.log main;
在打开
vim /etc/nginx/nginx.conf
查找到日志存放在哪里,发现日志存在/var/log/nginx/access.log
log_format  main  '$http_user_agent' '$remote_addr - $remote_user [$time_local] "$request" '
                  '$status $body_bytes_sent "$http_referer" '
                  '"$http_user_agent" "$http_x_forwarded_for" ';

access_log  /var/log/nginx/access.log  main;
向nginx.conf文件中添加$upstream_cache_status"指nginx代理缓存命中的值
log_format  main  '$http_user_agent' '$remote_addr - $remote_user [$time_local] "$request" '
                  '$status $body_bytes_sent "$http_referer" '
                  '"$http_user_agent" "$http_x_forwarded_for" '
                  '"$upstream_cache_status"';  #添加nginx缓存命中值

access_log  /var/log/nginx/access.log  main;
先清空一下代理缓存文件记录/var/log/nginx/host.access.log
>/var/log/nginx/host.access.log
清空后重启nginx服务,在浏览器上刷新页面。然后在命令行中输入
awk '{if($NF=="\"HIT\""){hit++}}END{printf "%.2f",hit/NR}' /var/log/nginx/host.access.log
打印出来的就是nginx缓存命中率。
6.代理缓存分片
slice
slice配置项是属于ngx_http_slice_module模块传送门
Syntax:	slice size;
Default: slice 0;
Context: http, server, location
示例配置
location / {
    slice             1m;
    proxy_cache       cache;
    proxy_cache_key   $uri$is_args$args$slice_range;
    proxy_set_header  Range $slice_range;
    proxy_cache_valid 200 206 1h;
    proxy_pass        http://localhost:8000;
}
分片优势
每个子请求收到的数据都会形成一个独立文件,一个请求断了,其他请求不受影响。
分片劣势
当文件很大或者slice很小的时候,可能会导致文件描述符耗尽等情况