在第一小节中介绍如果创建一个爬虫项目并跑起来,后面几个小节讲解了有关scrapy的基本知识。本小节将运用之前学习的知识写一个爬虫项目。
本次爬取的目标是下厨房,哈哈,被你们猜到了。小菜是个吃货,经常给自己开小灶。最近二师兄的身价是一路狂飙啊,隔几天身价就上涨一次,我们楼下小区的肉价已经是34元/斤,精肉38元/斤。看来突破50元/斤不是梦想啊。好像扯远了,回归正题。本次爬取的分类就是猪肉,看看小伙伴用猪肉食材能做什么好吃的。种子 http://www.xiachufang.com/category/731/
1.创建爬虫项目
在确定了要爬取的目标后,创建一个文件夹xiaChuFang
mkdir xiaChuFang

cd xiaChuFang

#anaconda 进入虚拟环境
activate PY37

#查看是否安装scrapy
pip list

#安装scrapy
conda install -c conda-forge scrapy

#列出当前安装的包,检查是否有scrapy包
pip list
安装好环境后,创建一个xiachufang项目
scrapy startproject xiachufang
运行这条命令有些小伙伴可能会报错误,请参考scrapy 解决方案
创建好项目后,项目结构如下:
xiachufang
|--xiachufang
     |--spiders
         |--__init__.py
     |--__init__.py
     |--items.py
     |--middlewares.py
     |--pipelines.py
     |--settings.py
|--scrapy.cfg
2.手写爬虫
在spiders文件夹下创建一个xiachufang.py
xiachufang
|--xiachufang
     |--spiders
         |--__init__.py
+        |--xcf.py
     |--__init__.py
     |--items.py
     |--middlewares.py
     |--pipelines.py
     |--settings.py
|--scrapy.cfg
编写xcf.py文件
import scrapy

class XcfSpider(scrapy.Spider):
    name = 'xcf'
    allowed_domains = ['xiachufang.com']
    start_urls = ['https://www.xiachufang.com/category/731/']

    def parse(self, response):
        pass
或者在spiders文件夹下执行
scrapy genspider xcf https://www.xiachufang.com/category/731/
修改settings.py
修改完成后,回到xiachufang项目中,也就是下级中有scrapy.cfg文件。运行项目
# 这里xcf是xcf.py文件中的name
scrapy crawl xcf
到这里我们就暂时认为项目跑起来了,小菜这里遇到了个问题,放在后面来详细说明。
3.写一个启动文件
上面我们写的爬虫项目,每次运行都要在命令行中执行
scrapy crawl xcf
比较麻烦,也不能打debug。为方便调试,我们新建一个mian文件作为入口文件,然后在main文件中执行爬虫项目。
xiachufang
 |--xiachufang
     |--spiders
         |--__init__.py
         |--xcf.py
     |--__init__.py
     |--items.py
     |--middlewares.py
     |--pipelines.py
     |--settings.py
 |--scrapy.cfg
+|--main.py
main.py
from scrapy.cmdline import execute

import sys
import os

# 获取mian文件的路径
curr_path = os.path.abspath(__file__)
# 获取文件夹
dir_path = os.path.dirname(curr_path)

if __name__ == "__main__":
    sys.path.append(dir_path)
    execute(["scrapy","crawl","xcf"])
在xcf.py的parse方法中打上断点
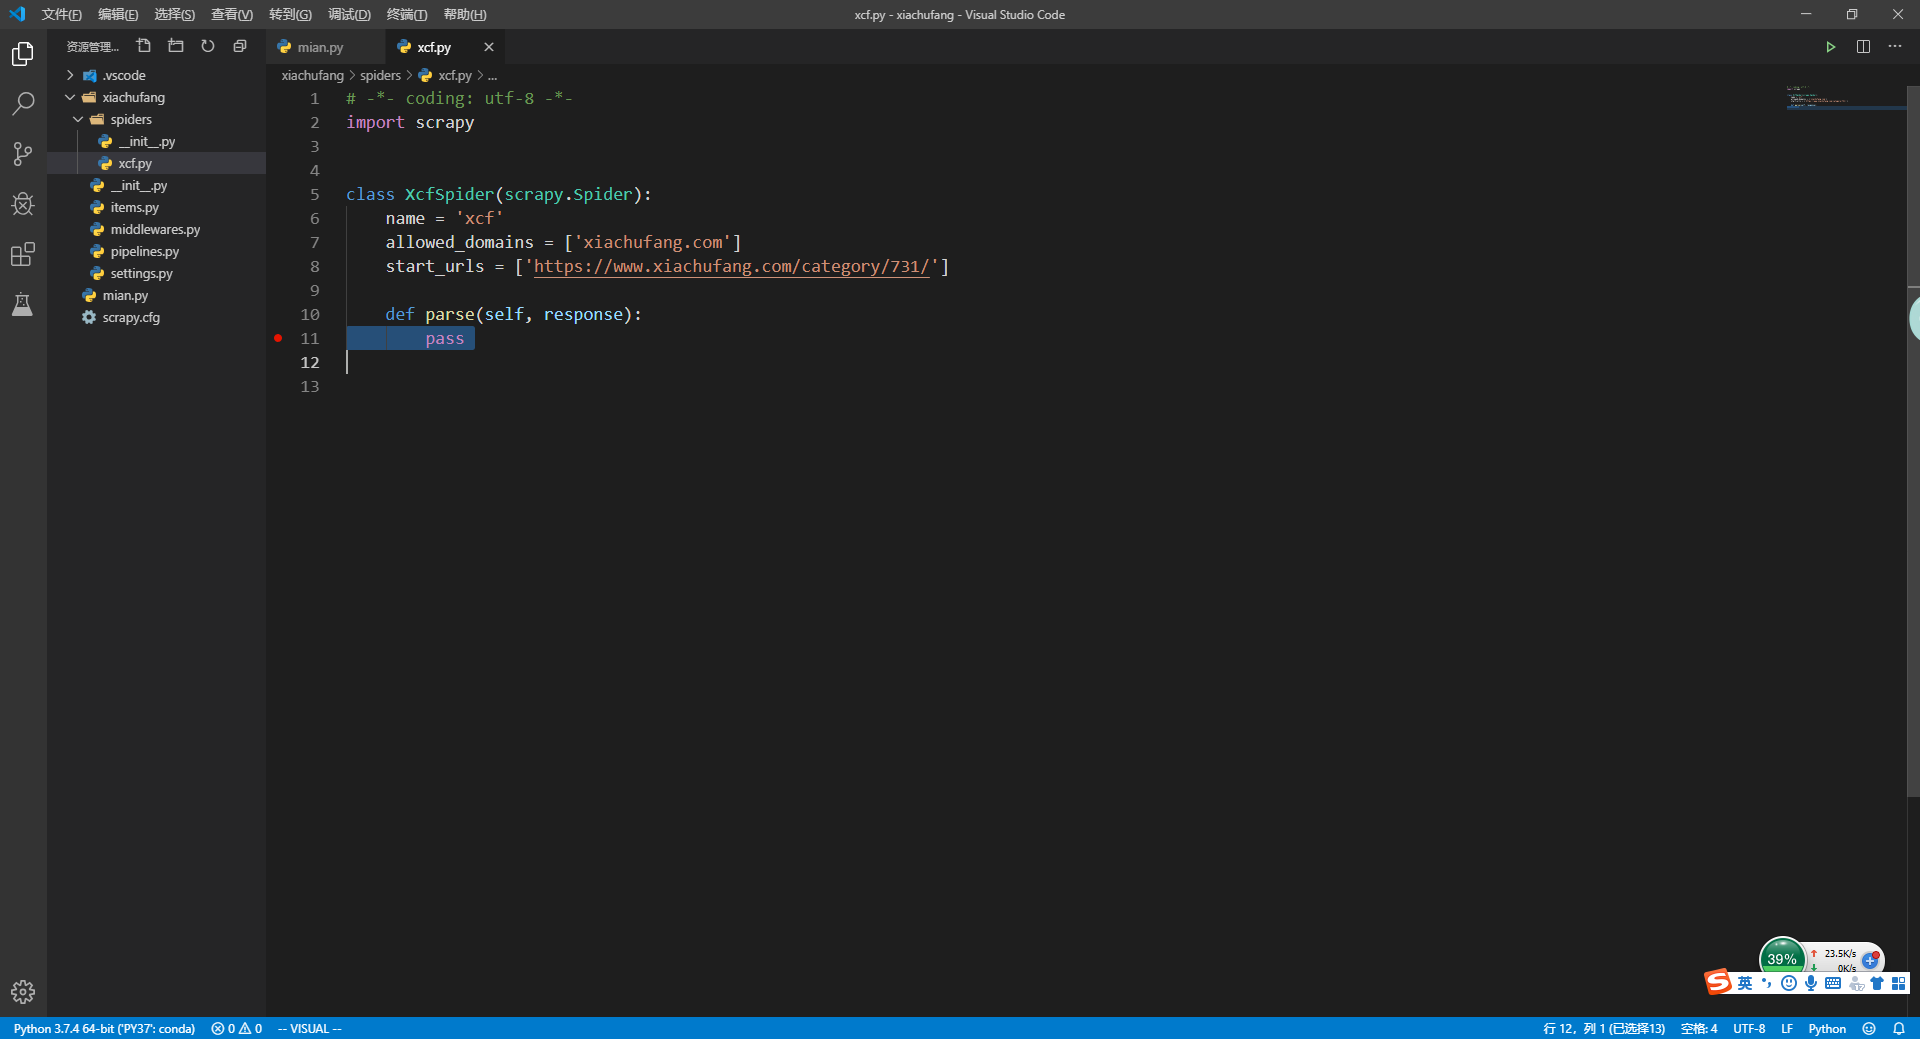
在到mian.py文件中按F5进入调试模式(小菜用的vscode编辑器,大家根据自己编辑器来调出Debug模式)还需要注意的是编辑器是用python环境要设置好,不然也会出问题。vscode 和 pycharm编辑器切换python环境
按道理来说做到这里,基本上就没问题了,可小菜偏偏给自己挖了坑。断点没有进入parse()方法是因为start_urls填写的有问题,至于什么问题请看Scrapy spider未进入parse
4.编写parse
xcf.py
import scrapy
from scrapy.http import Request
from urllib import parse
class XcfSpider(scrapy.Spider):
name = 'xcf'
allowed_domains = ['xiachufang.com']
start_urls = ['https://www.xiachufang.com/category/731/']
def parse(self, response):
#获取文章url
post_urls = response.css('.ing-recipe .normal-recipe-list li>.recipe>a::attr(href)').getall()
for post_url in post_urls:
yield Request(url = parse.urljoin(response.url, post_url), callback= self.parse_detail)
#判断是否有下一页
next_url = response.css('.ing-recipe .pager a.next::attr(href)').get()
if next_url:
yield Request(url= parse.urljoin(response.url, next_url), callback= self.parse)
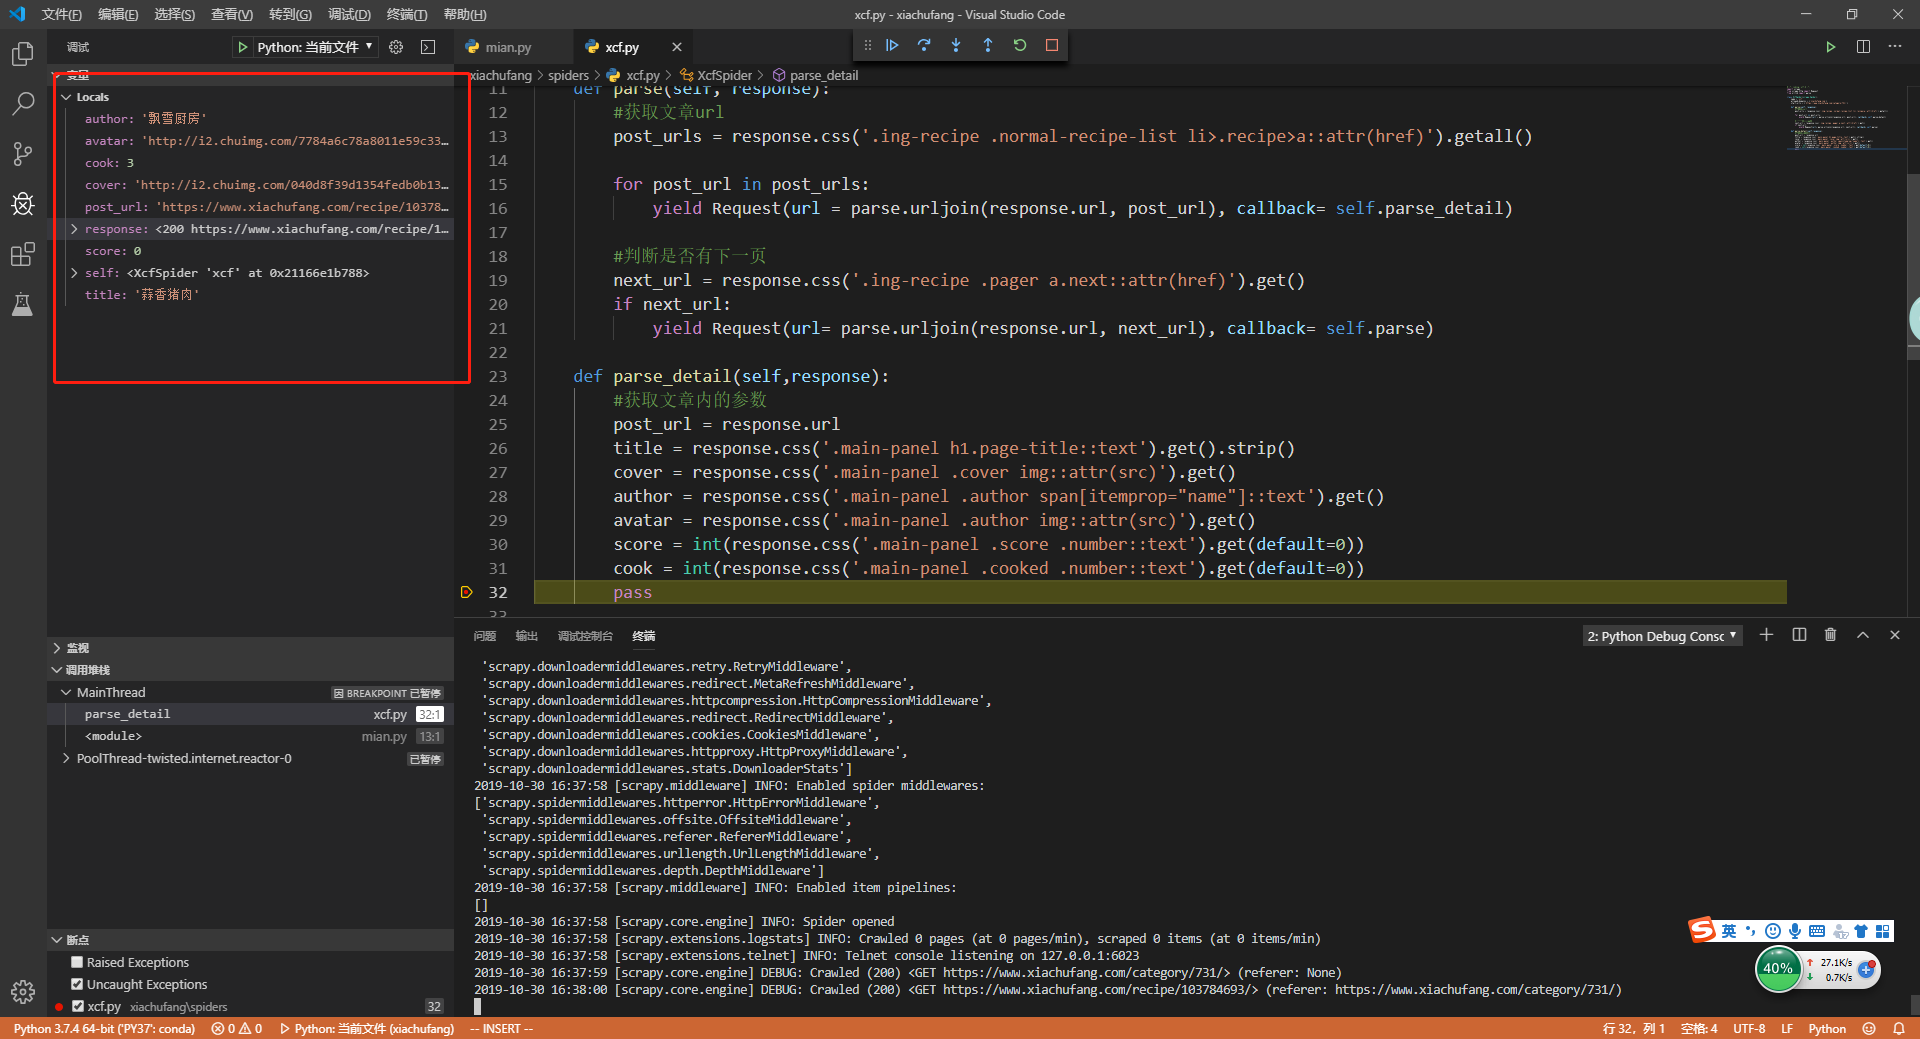
def parse_detail(self,response):
#获取文章内的参数
post_url = response.url
title = response.css('.main-panel h1.page-title::text').get().strip()
cover = response.css('.main-panel .cover img::attr(src)').get()
author = response.css('.main-panel .author span[itemprop="name"]::text').get()
avatar = response.css('.main-panel .author img::attr(src)').get()
score = int(response.css('.main-panel .score .number::text').get(default=0))
cook = int(response.css('.main-panel .cooked .number::text').get(default=0))
pass
这里需要注意的是,使用css或xpath选择器提取,一定要要调试,不然很容易提取的字段出错。在main.py中启动一下爬虫,然后在parse_detail()方法打下断点,看看我们提取的字段对不对
5.编写Item
Item主要的目的就是将非结构化源中提取结构化数据。Scrapy Spider可以将提取的数据作为Python字典返回。Python字典虽然方便且熟悉,但缺乏结构:很容易在字段名称中输入错误或返回不一致的数据,尤其是在具有许多蜘蛛的大型项目中。
定义item后,如果在settings.py中打开ITEM_PIPELINES,那么所有item就会流向item_pipelines
items.py
import scrapy

class XiachufangItem(scrapy.Item):

    post_url = scrapy.Field()
    title = scrapy.Field()
    cover = scrapy.Field()
    author = scrapy.Field()
    avatar = scrapy.Field()
    score = scrapy.Field()
    cook = scrapy.Field()
定义好Item后,将xcf.py中parse_detail()解析的值填充Item中
修改xcf.py
import scrapy
from scrapy.http import Request
from urllib import parse

+ from xiachufang.items import XiachufangItem

class XcfSpider(scrapy.Spider):
    name = 'xcf'
    allowed_domains = ['xiachufang.com']
    start_urls = ['https://www.xiachufang.com/category/731/']

    def parse(self, response):
        #获取文章url
        post_urls = response.css('.ing-recipe .normal-recipe-list li>.recipe>a::attr(href)').getall()

        for post_url in post_urls:
            yield Request(url = parse.urljoin(response.url, post_url), callback= self.parse_detail)

        #判断是否有下一页
        next_url = response.css('.ing-recipe .pager a.next::attr(href)').get()
        if next_url:
            yield Request(url= parse.urljoin(response.url, next_url), callback= self.parse)

    def parse_detail(self,response):
        #实例化XiachufangItem
+        post_item = XiachufangItem()

        #获取文章内的参数
        post_url = response.url
        title = response.css('.main-panel h1.page-title::text').get().strip()
        cover = response.css('.main-panel .cover img::attr(src)').get()
        author = response.css('.main-panel .author span[itemprop="name"]::text').get()
        avatar = response.css('.main-panel .author img::attr(src)').get()
        score = int(response.css('.main-panel .score .number::text').get(default=0))
        cook = int(response.css('.main-panel .cooked .number::text').get(default=0))

        #将值填充到Item
+        post_item['post_url'] = post_url
+        post_item['title'] = title
+        post_item['cover'] = cover
+        post_item['author'] = author
+        post_item['avatar'] = avatar
+        post_item['score'] = score
+        post_item['cook'] = cook

        #返回设置后item
+        yield post_item
设置好item后,item就会流向pipline,在settings.py文件中打开ITEM_PIPELINES
打开 settings.py 中ITEM_PIPELINES
# Configure item pipelines
# See https://docs.scrapy.org/en/latest/topics/item-pipeline.html
+ ITEM_PIPELINES = {
+    'xiachufang.pipelines.XiachufangPipeline': 300,
+ }
打开了ITEM_PIPELINES后,在pipelines.py中设置断点,然后在启动main.py
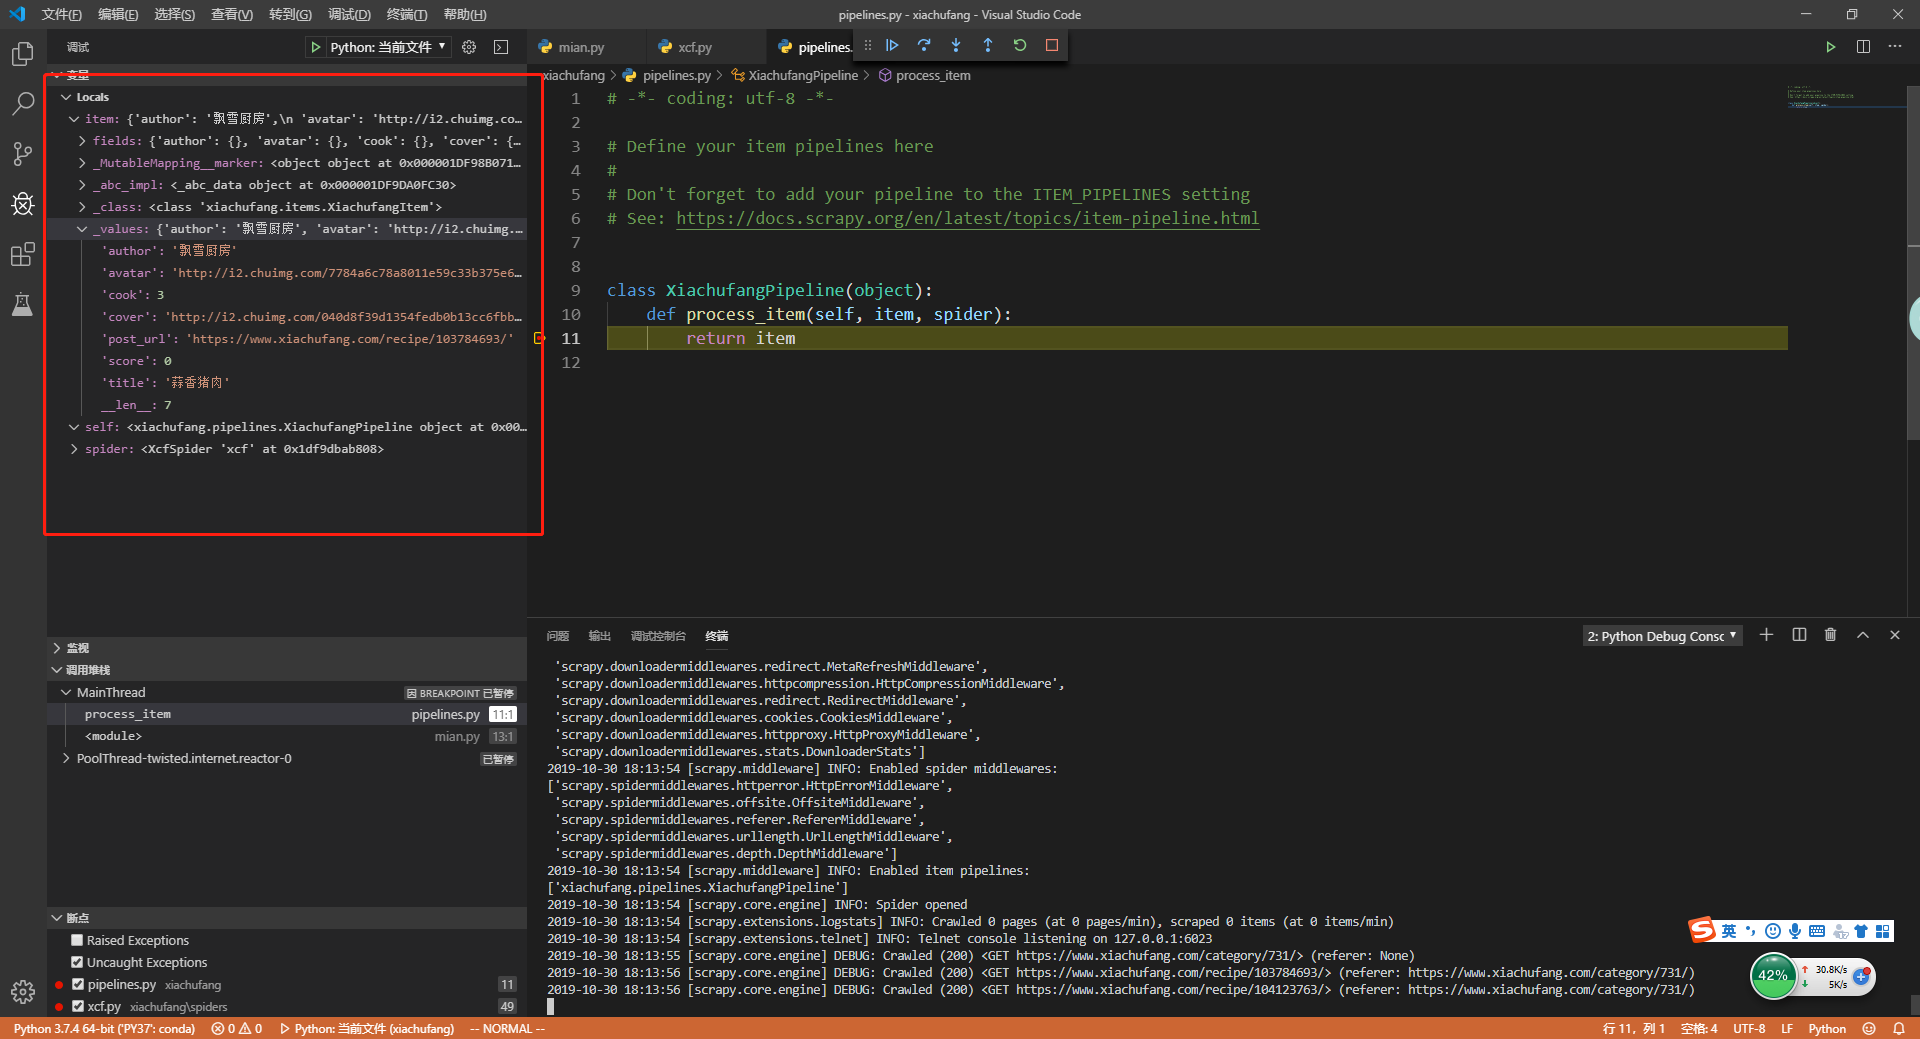
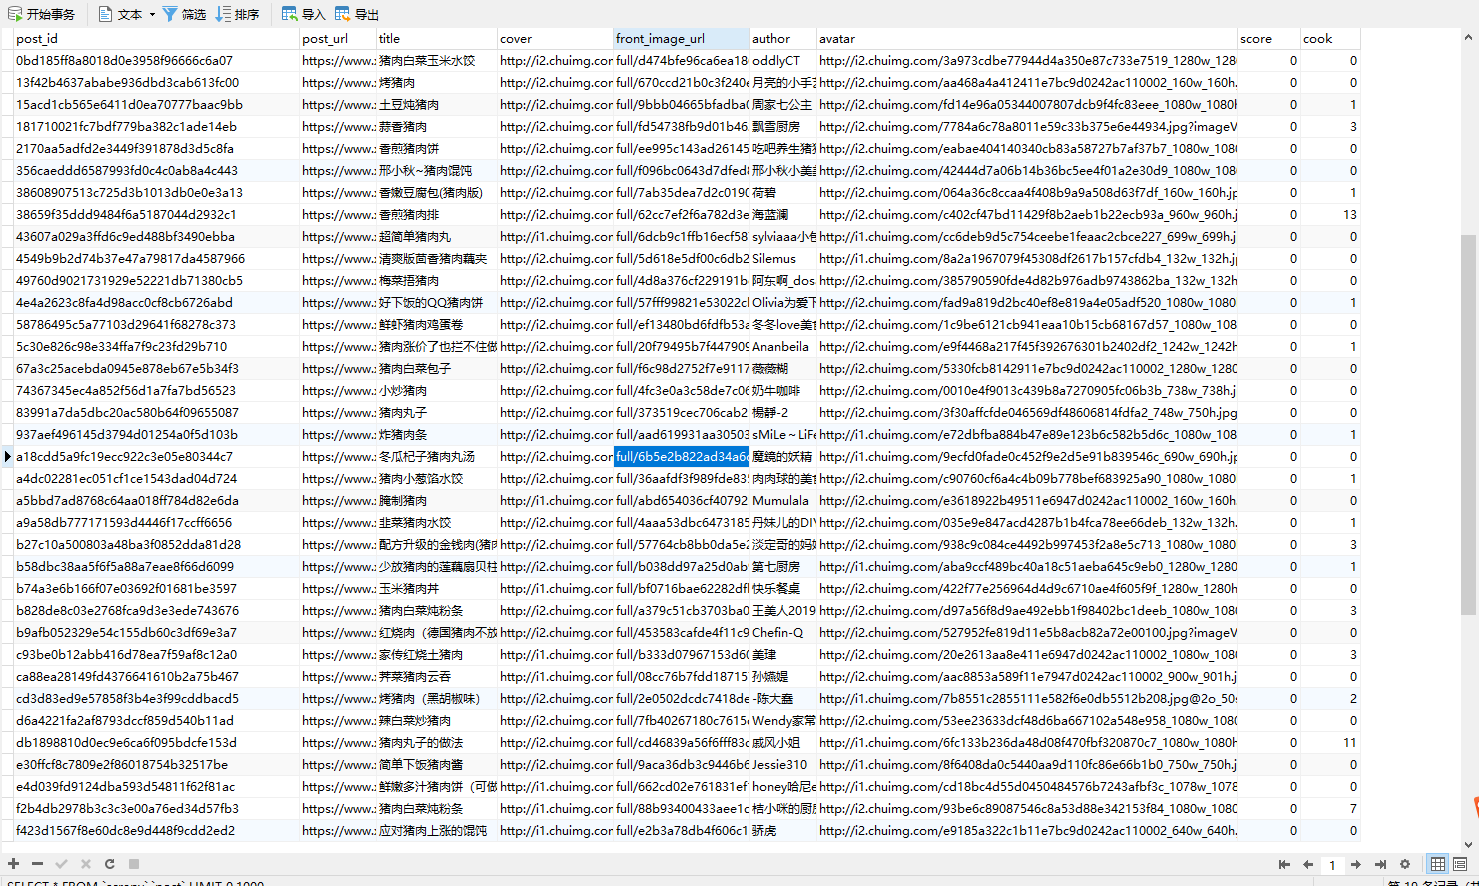
可以看到,item流向pipelines并在piplines中成功接收到了item的数据。
6.下载封面图片
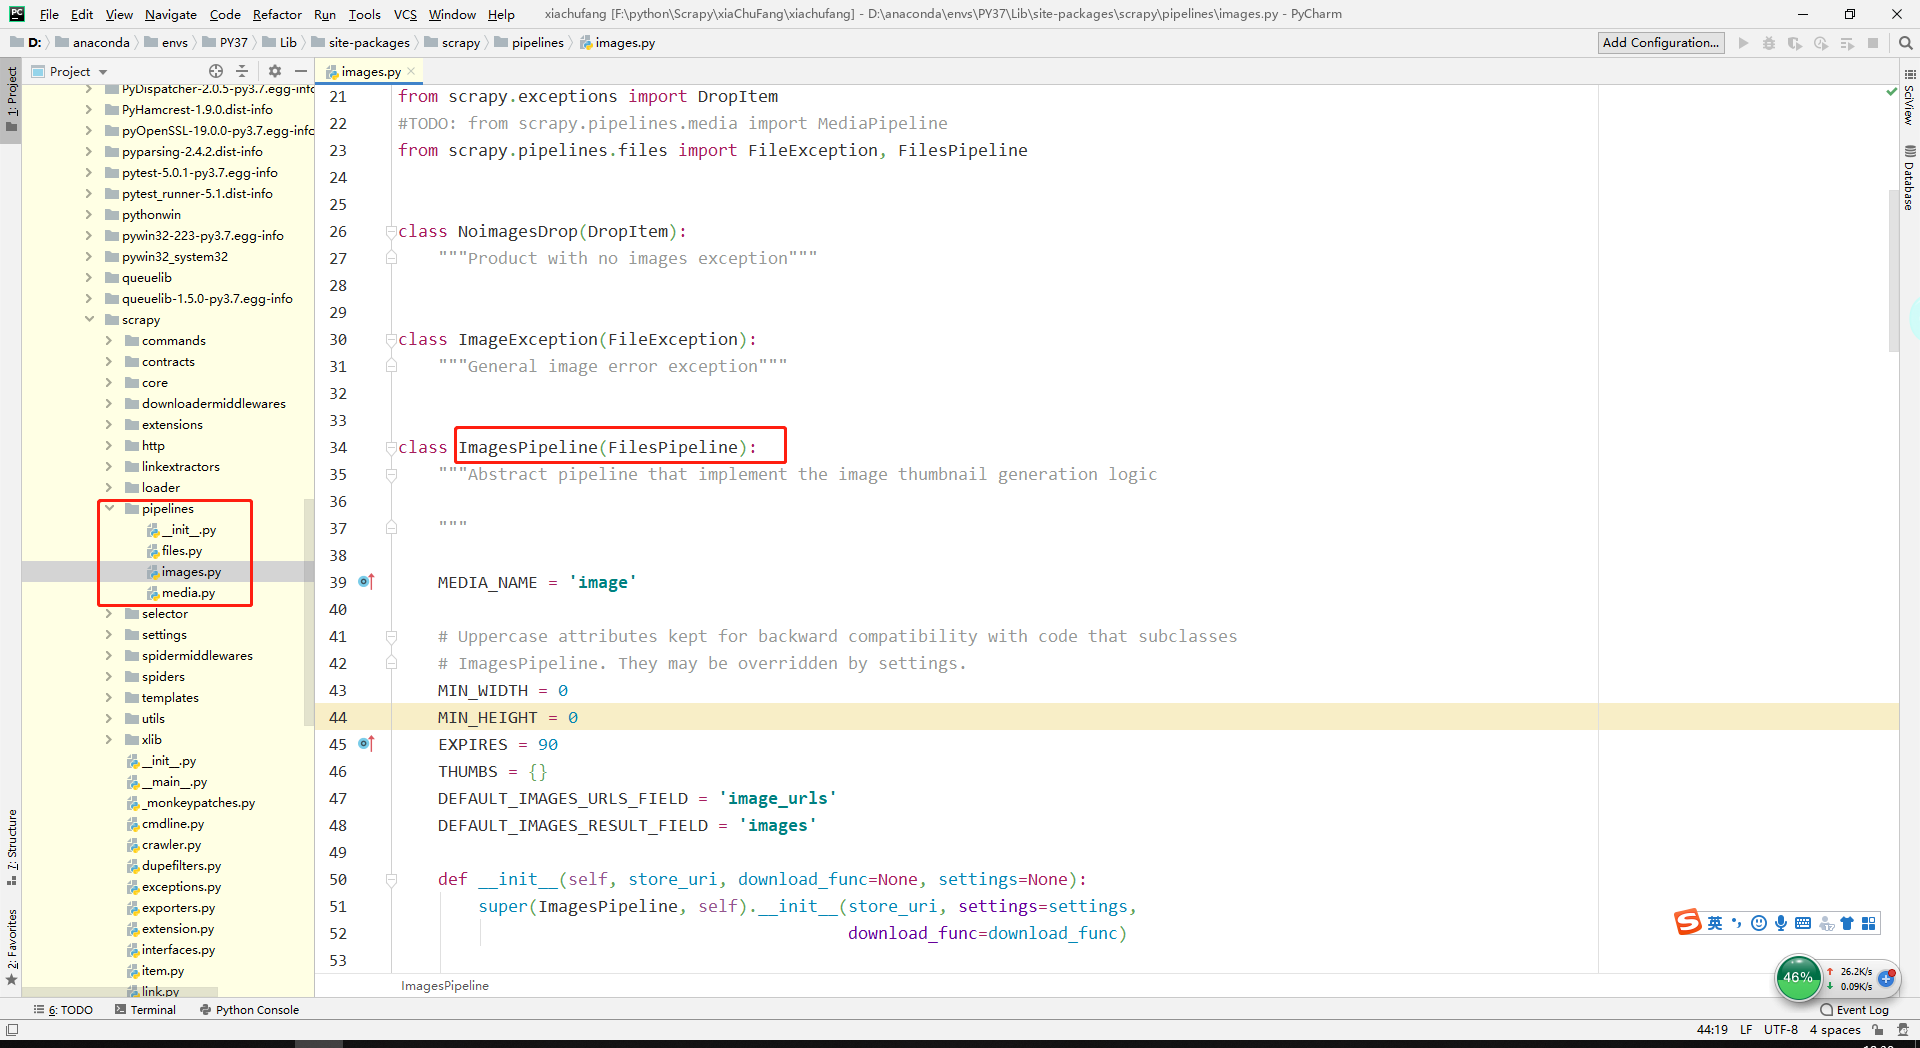
上面打开了ITEM_PIPELINES,那么所有的item就会流向item_pipelines,在scrapy中自带了下载图片的ImagesPipeline
修改settings.py
+ import os
...
# Configure item pipelines
# See https://docs.scrapy.org/en/latest/topics/item-pipeline.html
ITEM_PIPELINES = {
   'xiachufang.pipelines.XiachufangPipeline': 300,
+   'scrapy.pipelines.images.ImagesPipeline': 1
}
#配置ImagesPipeline获取那个字段
+ IMAGES_URLS_FIELD = "cover"

#获取当前文件路径
+ img_dir = os.path.abspath(os.path.dirname(__file__))

#设置下载的路径
+ IMAGES_STORE = os.path.join(img_dir, 'images')
...
ITEM_PIPELINES中的pipeline后面的数值表示的是优先级,数值越小,管道的优先级越高。
有关于图片的设置在官方settings有讲到,刚兴趣的小伙伴可以看看。
配置好后,然后重启main.py发现控制台报一个错误
 File "<frozen importlib._bootstrap>", line 1006, in _gcd_import
  File "<frozen importlib._bootstrap>", line 983, in _find_and_load
  File "<frozen importlib._bootstrap>", line 967, in _find_and_load_unlocked
  File "<frozen importlib._bootstrap>", line 677, in _load_unlocked
  File "<frozen importlib._bootstrap_external>", line 728, in exec_module
  File "<frozen importlib._bootstrap>", line 219, in _call_with_frames_removed
  File "D:\anaconda\envs\PY37\lib\site-packages\scrapy\pipelines\images.py", line 15, in <module>
    from PIL import Image
ModuleNotFoundError: No module named 'PIL'
说我们没有安装PIL库,我们在anaconda中安装一下,如果不熟悉anaconda的小伙伴,建议看看anaconda安装插件命令
conda install pillow

#检查是否安装成功
pip list
然后在重启mian.py,这次爬虫跑起来了,但是在images文件下确没有图片,查看控制台信息,发现 raise ValueError('Missing scheme in request url: %s' % self._url)
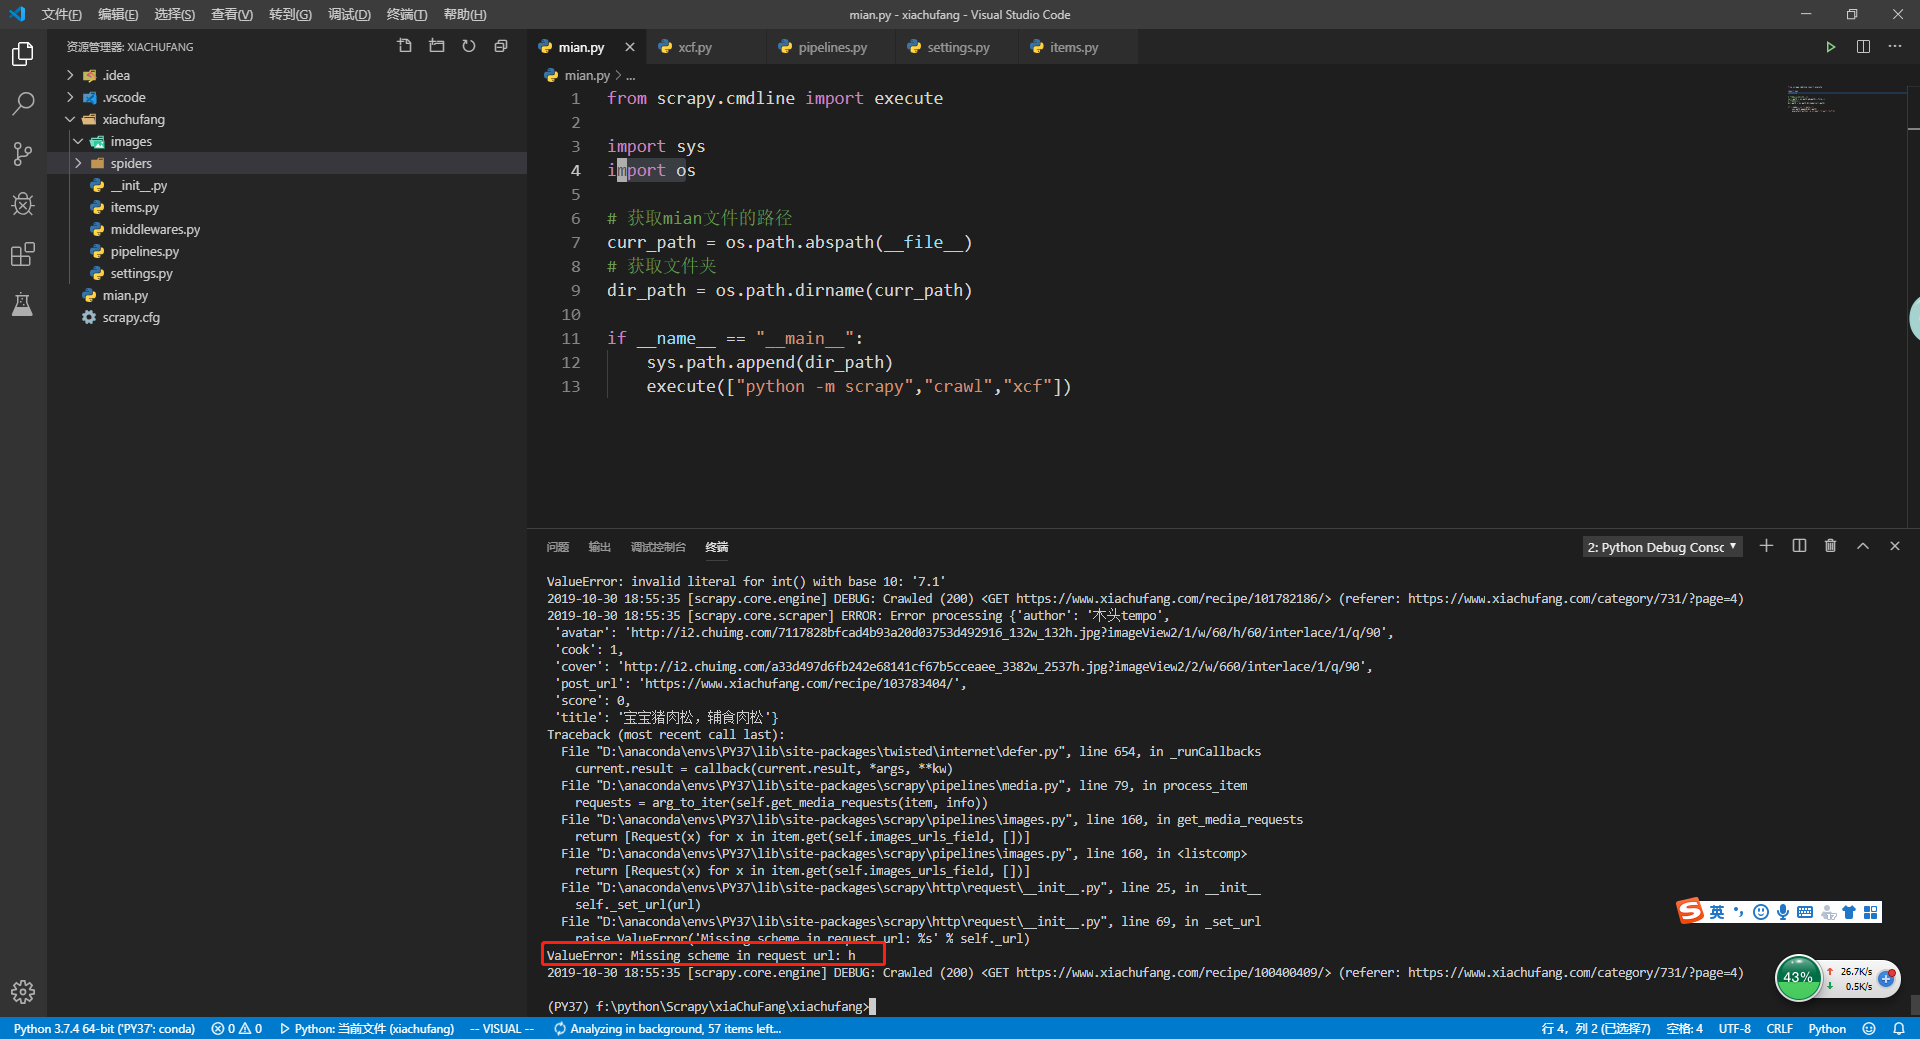
这个是因为IMAGES_URLS_FIELD需要传递一个数组
####解决方案,修改xcf.py
- post_item['cover'] = cover
+ post_item['cover'] = [cover]
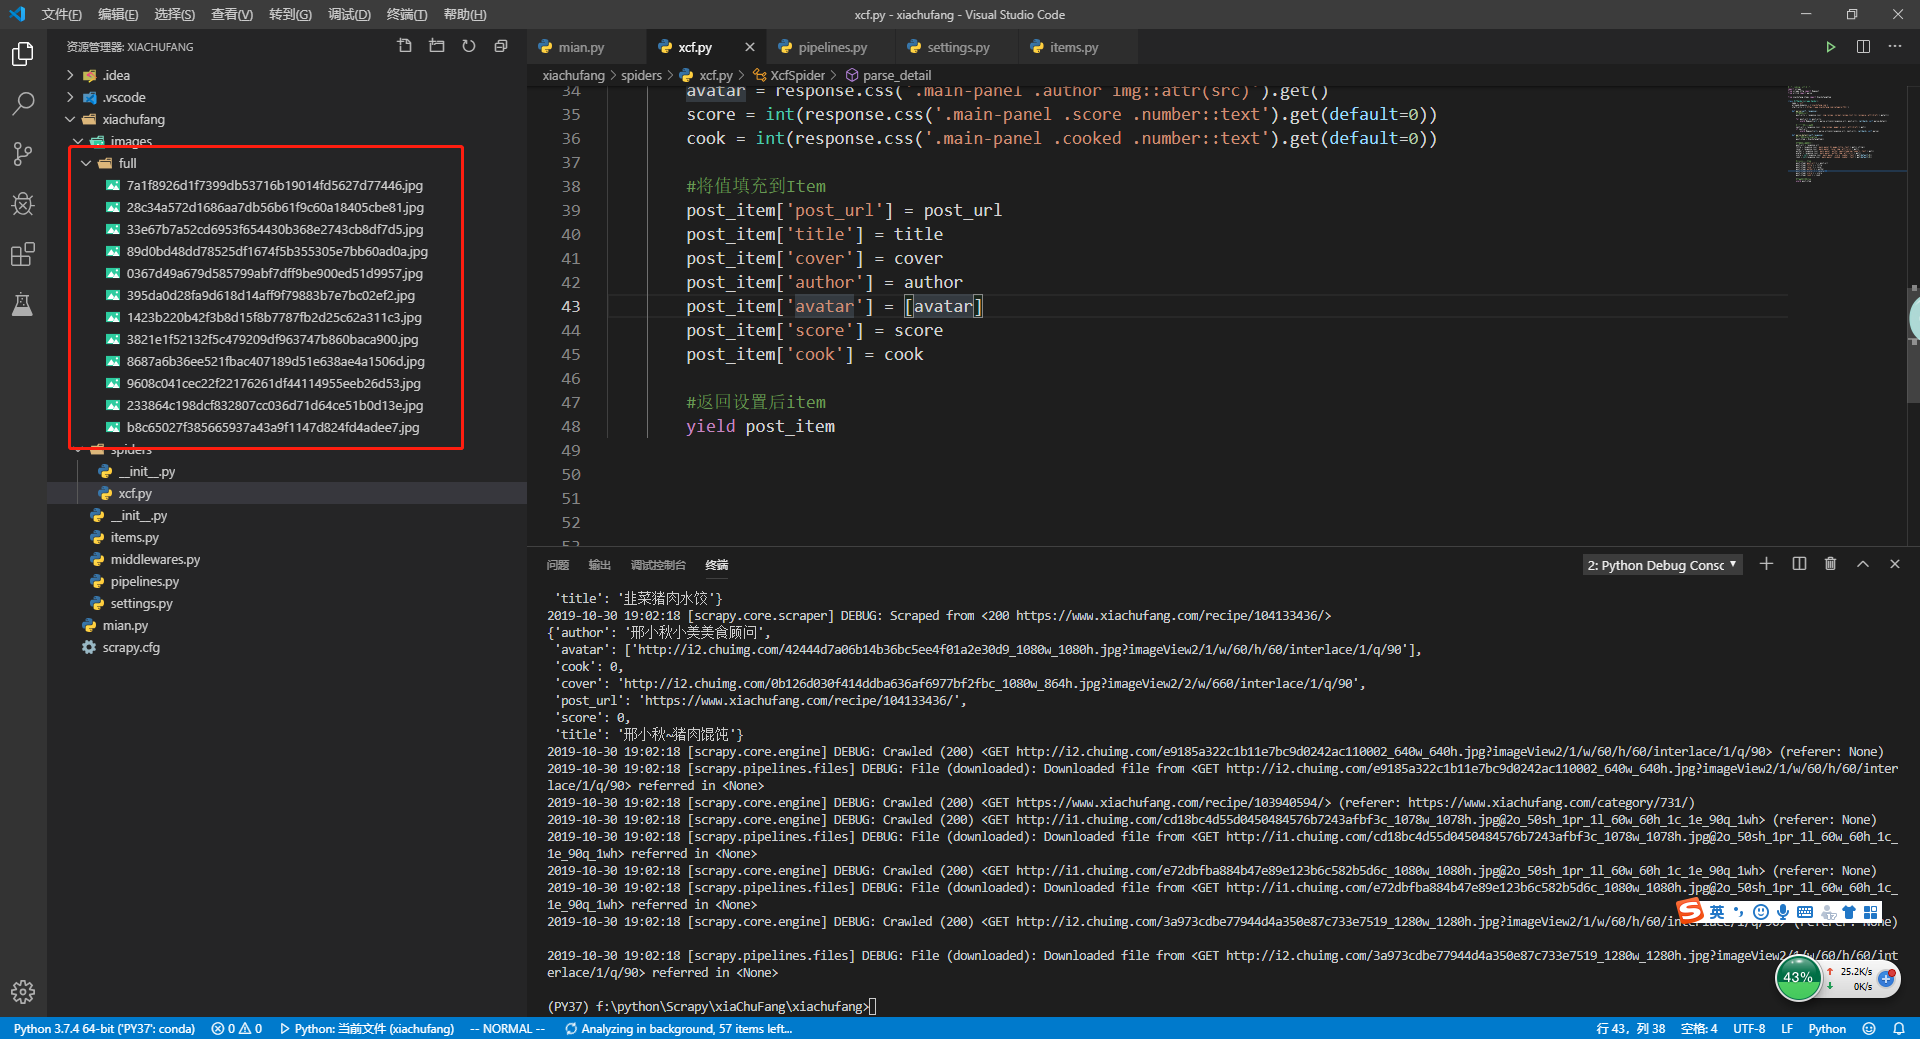
修改好后,重新运行main.py,这次看到了在images文件下有图片
7.提取图片路径
现在爬虫已经可以下载图片,一般在服务器上运行爬虫时,将下载的图片保存在服务器指定的目录后,还需要将服务器上图片的路径存放在数据库中,这样就可以通过查询数据库知道访问图片的网络地址。
修改items.py
添加一个存放图片的字段
class XiachufangItem(scrapy.Item):

    post_url = scrapy.Field()
    title = scrapy.Field()
    cover = scrapy.Field()
+    front_image_url = scrapy.Field()
    author = scrapy.Field()
    avatar = scrapy.Field()
    score = scrapy.Field()
    cook = scrapy.Field()
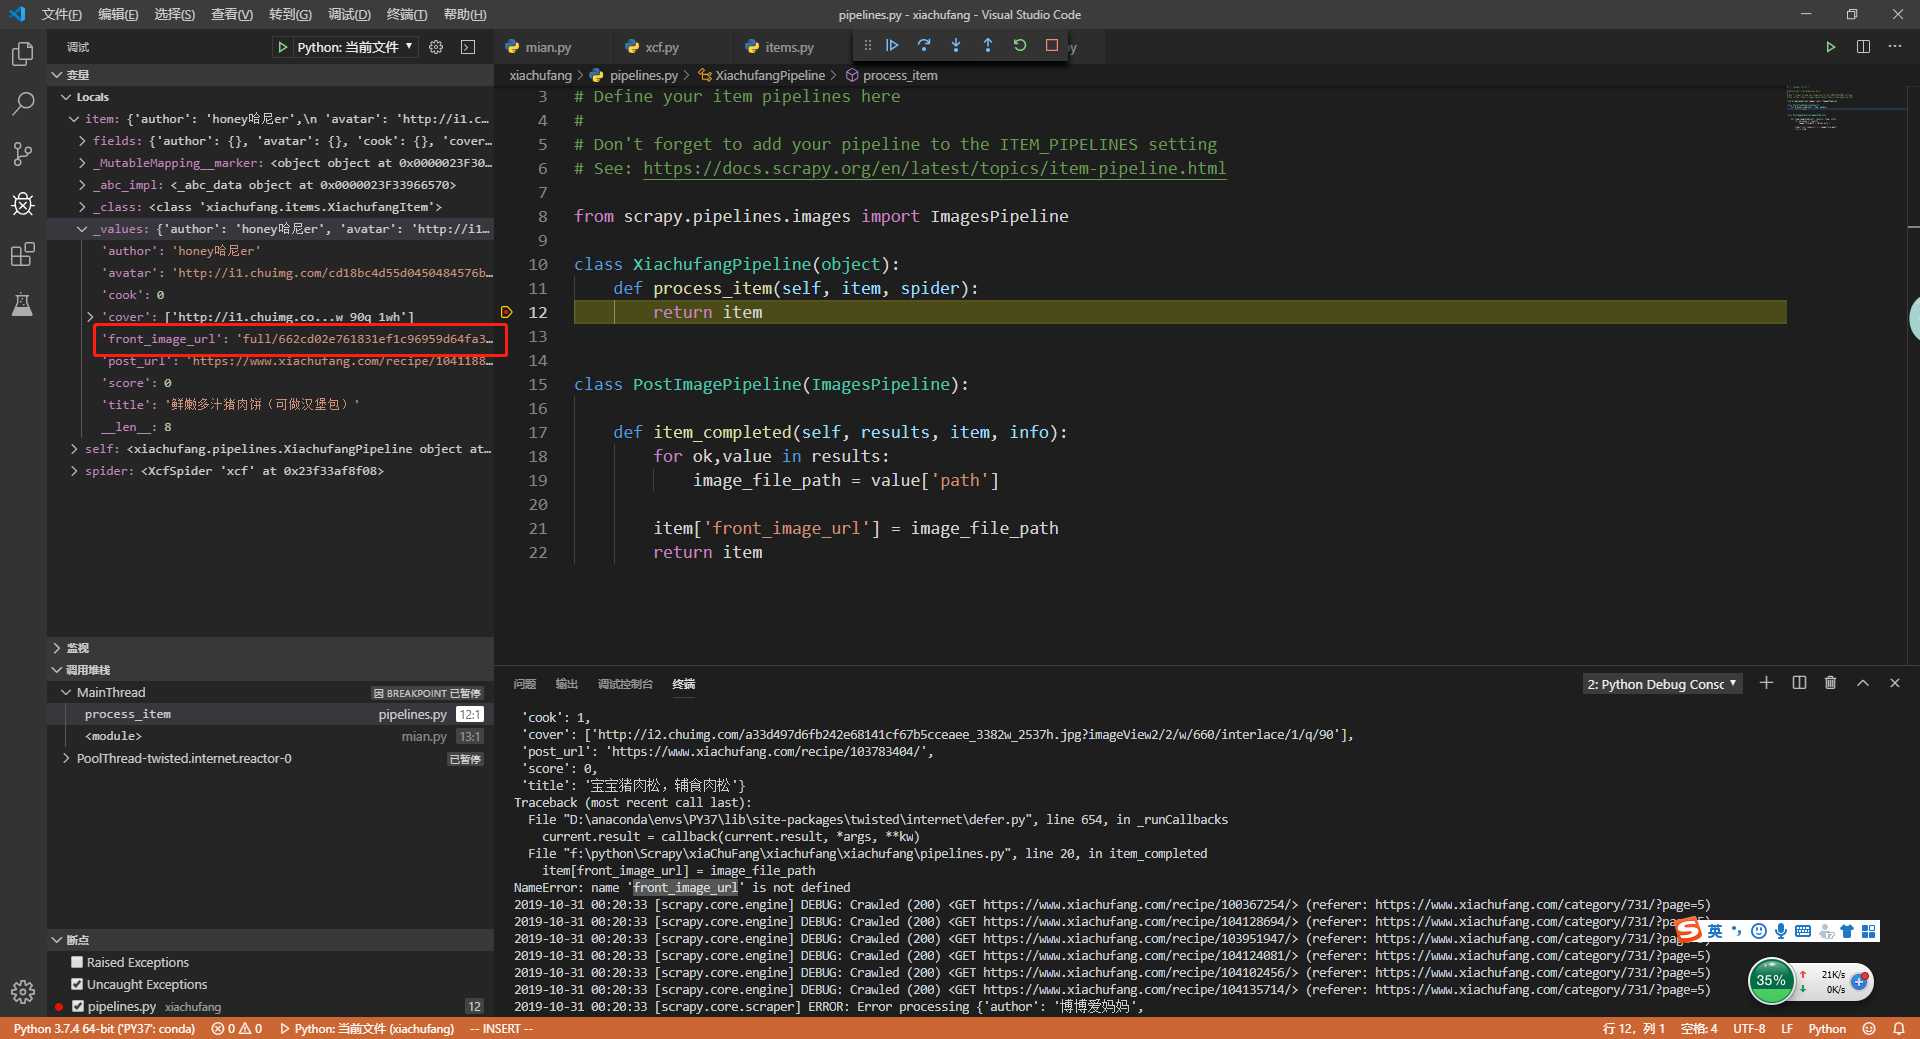
pipelines.py 新建一个管道
+ from scrapy.pipelines.images import ImagesPipeline

class XiachufangPipeline(object):
    def process_item(self, item, spider):
        return item


+ class PostImagePipeline(ImagesPipeline):

+    def item_completed(self, results, item, info):
+        for ok,value in results:
+            image_file_path = value['path']
+
+        item['front_image_url'] = image_file_path
+        return item
在pipelines.py文件中新建一个PostImagePipeline管道用于用于处理fornt_image_url,然后在settings.py中将PostImagePipeline管道优先级调高
settings.py
ITEM_PIPELINES = {
   'xiachufang.pipelines.XiachufangPipeline': 300,
   # 'scrapy.pipelines.images.ImagesPipeline': 1
+   'xiachufang.pipelines.PostImagePipeline': 1
}
重新运行main.py,在XiachufangPipeline管道中打个断点,看到item中的front_image_url字段已经有值了
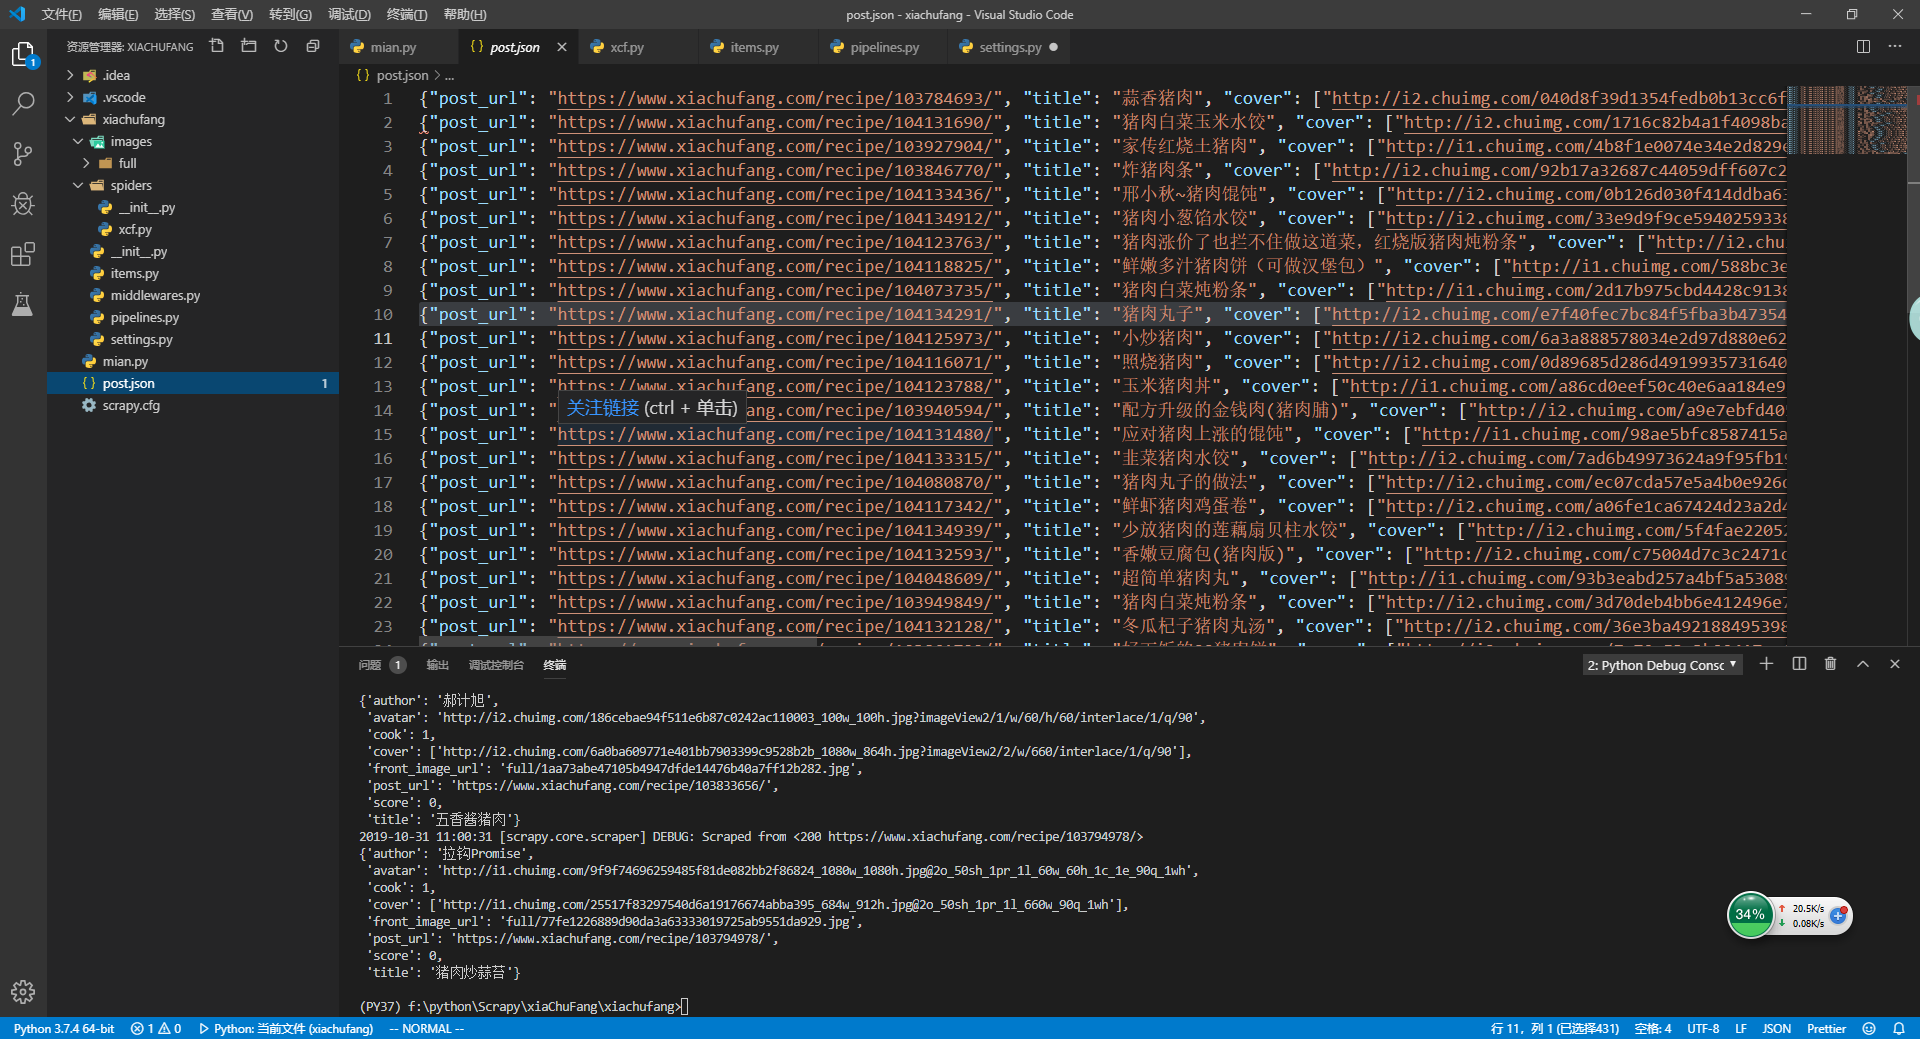
8.自定义保存json文件
通过上面的练习,知道可以在pipeline中拦截处理item数据,要将数据保存成json文件,现在pipelines.py中新建一个JsonWithEncodingPipeline
pipelines.py
from scrapy.pipelines.images import ImagesPipeline
+ import codecs
+ import json

class XiachufangPipeline(object):
    def process_item(self, item, spider):
        return item


class PostImagePipeline(ImagesPipeline):

    def item_completed(self, results, item, info):
        for ok,value in results:
            image_file_path = value['path']

        item['front_image_url'] = image_file_path
        return item

+ class JsonWithEncodingPipeline(object):
+
+     def __init__(self):
+         self.file = codecs.open('post.json','w',encoding='utf-8')
+
+     def process_item(self,item,spider):
+         lines = json.dumps(dict(item), ensure_ascii=False) + '\n'
+         self.file.write(lines)
+         return item
+
+     def spider_closed(self, spider):
+         self.file.close()
+
将管道添加到ITEM_PIPELINE中
settings.py
ITEM_PIPELINES = {
   'xiachufang.pipelines.XiachufangPipeline': 300,
   # 'scrapy.pipelines.images.ImagesPipeline': 1
   'xiachufang.pipelines.PostImagePipeline': 1,
+   'xiachufang.pipelines.JsonWithEncodingPipeline': 2,
}
添加好后,然后重启main.py,就可以看到在项目下面有post.json文件生成
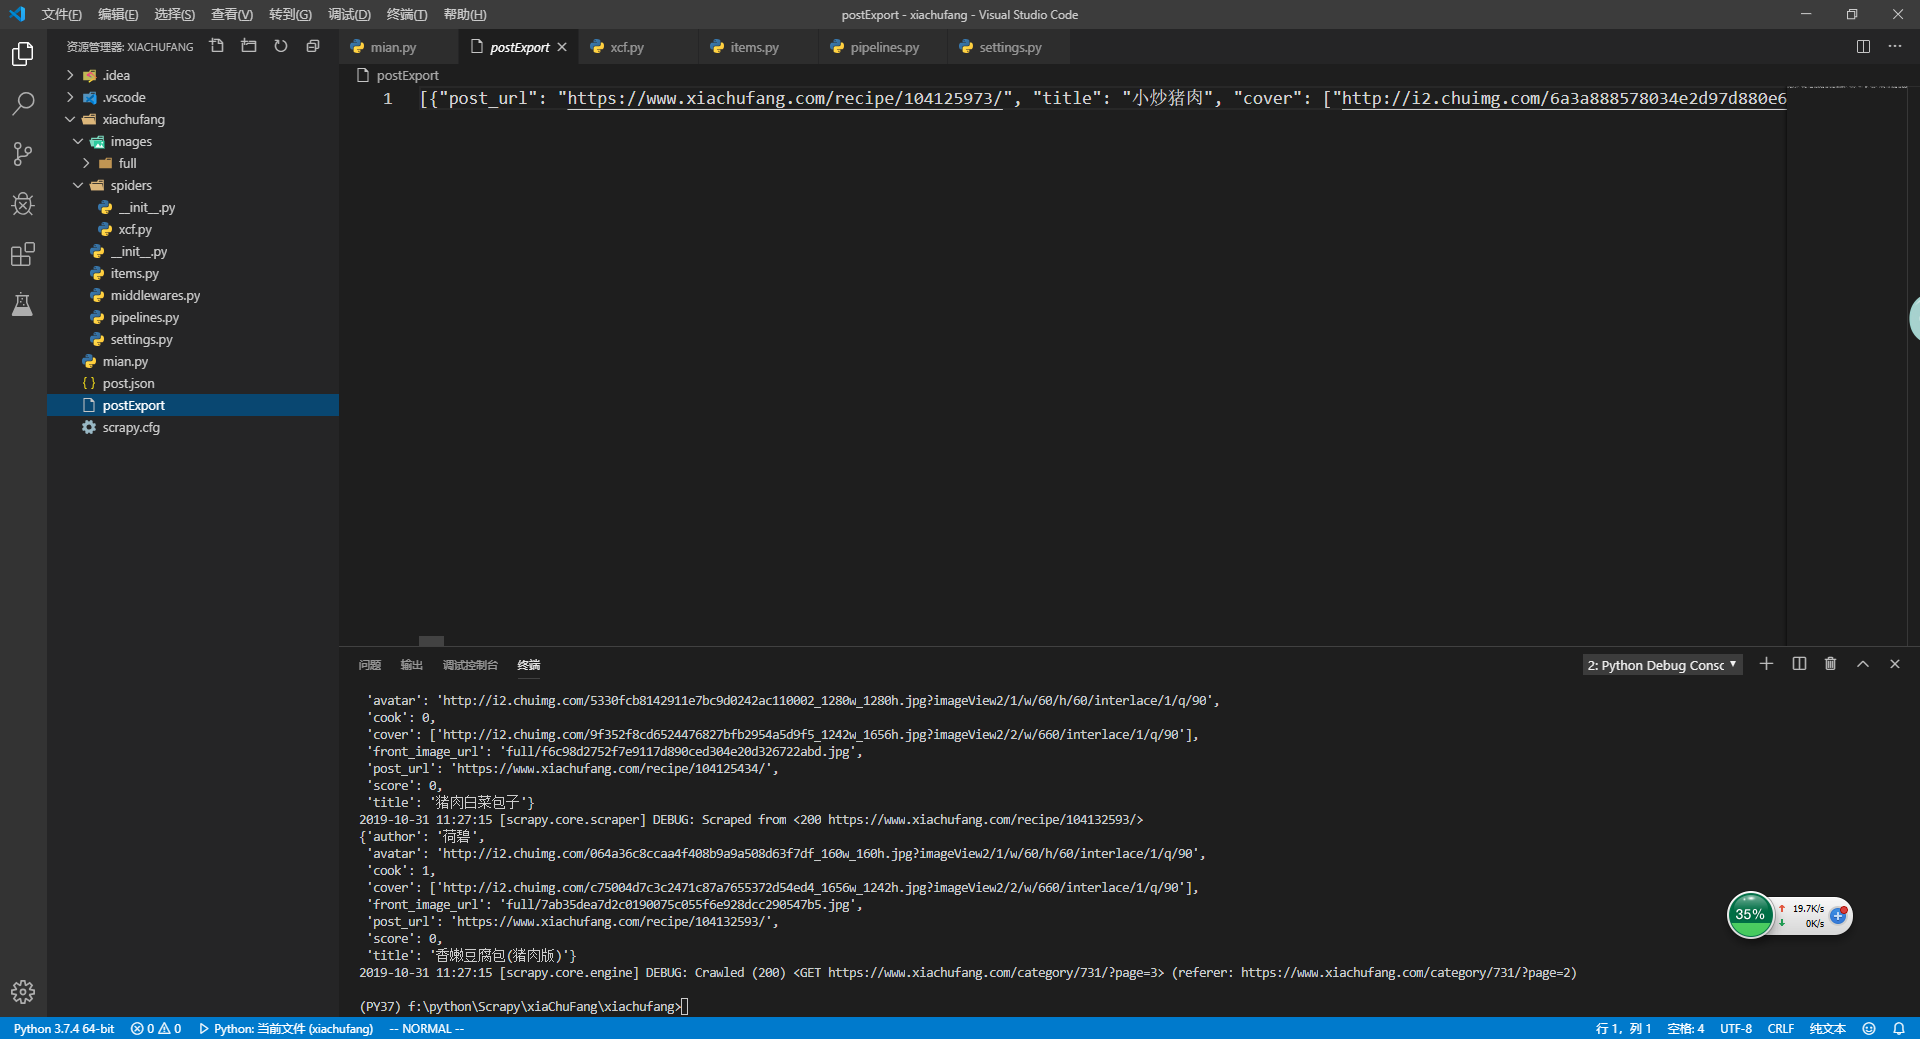
9.scrapy保存json文件
在scrapy中自带了文件写入方法,感兴趣的小伙伴请看feed export 官方文档,文档中提供导出多种文件方法json、jsonline、cvs、xml,演示只用到了json
修改pipelines.py
from scrapy.pipelines.images import ImagesPipeline
import codecs
import json

+ from scrapy.exporters import JsonItemExporter

class XiachufangPipeline(object):
    def process_item(self, item, spider):
        return item


class PostImagePipeline(ImagesPipeline):

    def item_completed(self, results, item, info):
        for ok,value in results:
            image_file_path = value['path']

        item['front_image_url'] = image_file_path
        return item

class JsonWithEncodingPipeline(object):
    #自定义
    def __init__(self):
        self.file = codecs.open('post.json','w',encoding='utf-8')

    def process_item(self,item,spider):
        lines = json.dumps(dict(item), ensure_ascii=False) + '\n'
        self.file.write(lines)
        return item

    def spider_closed(self, spider):
        self.file.close()

+ class JsonExporterPipeline(object):
+     #scrapy自带方法
+     def __init__(self):
+         self.file = open('postExport.json','wb')
+         self.exporter = JsonItemExporter(self.file, encoding='utf-8', ensure_ascii=False)
+         self.exporter.start_exporting()
+
+     def close_spider(self,spider):
+         self.exporter.finish_exporting()
+         self.file.close()
+
+     def process_item(self,item, spider):
+         self.exporter.export_item(item)
+         return item
激活下JsonExporterPipeline管道
settings.py
ITEM_PIPELINES = {
   'xiachufang.pipelines.XiachufangPipeline': 300,
   # 'scrapy.pipelines.images.ImagesPipeline': 1
   'xiachufang.pipelines.PostImagePipeline': 1,
-   # 'xiachufang.pipelines.JsonWithEncodingPipeline': 2,
+   'xiachufang.pipelines.JsonExporterPipeline': 2,
}
然后重启mian.py,看到在项目中生成postExport.json文件
10.自定义保存mysql
上面演示如何将item保存成json文件,下面将介绍如何把item保存在我们mysql数据库中。
创建数据库,数据表
这里就不详细记录如何创建数据库和数据表了,如果不是很清楚的话,建议小伙伴看看小菜之前sql教程。
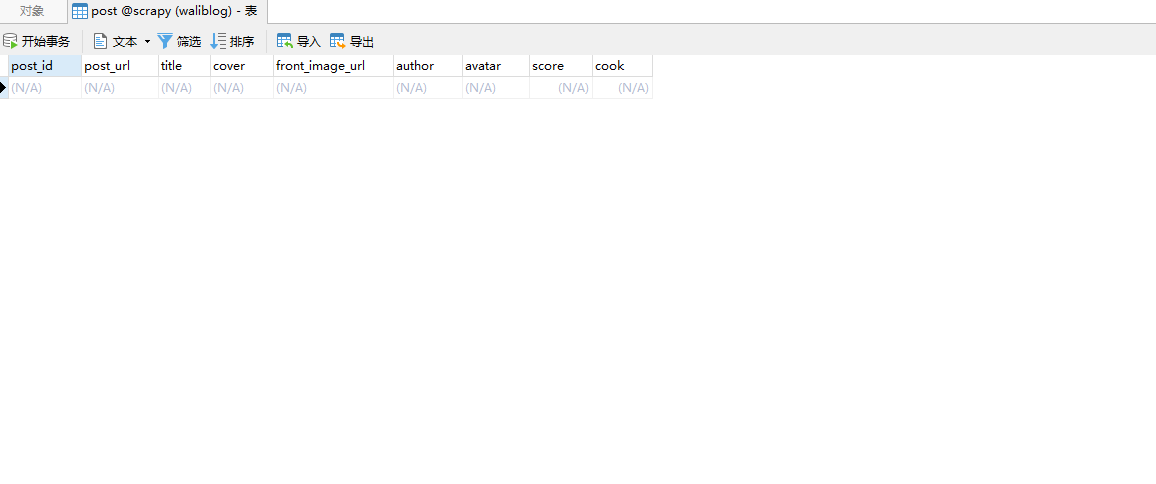
所有字段都是item里面定义的,只有post_id没有,post_id是用文章url生成唯一编号。
文件结构
xiachufang
 |--xiachufang
     |--spiders
         |--__init__.py
         |--xcf.py
+     |--utils
+         |--common.py
+         |--__init__.py
     |--__init__.py
     |--items.py
     |--middlewares.py
     |--pipelines.py
     |--settings.py
 |--scrapy.cfg
 |--main.py
common.py
在common.py中写一个方法,将url转换成md5
import hashlib

def get_md5(url):
    if isinstance(url, str):
        url = url.encode('utf-8')
    m = hashlib.md5()
    m.update(url)

    return m.hexdigest()
items.py 定义 post_id
import scrapy

class XiachufangItem(scrapy.Item):

    post_url = scrapy.Field()
+    post_id = scrapy.Field()
    title = scrapy.Field()
    cover = scrapy.Field()
    front_image_url = scrapy.Field()
    author = scrapy.Field()
    avatar = scrapy.Field()
    score = scrapy.Field()
    cook = scrapy.Field()
修改xcf.py
items.py中定义完post_id后,然后在xcf.py文件中将post_id的值填充进去
+ from xiachufang.utils.common import get_md5

#将值填充到Item
    post_item['post_url'] = post_url
+    post_item['post_id'] = get_md5(post_url)
    post_item['title'] = title
    post_item['cover'] = [cover]
    post_item['author'] = author
    post_item['avatar'] = avatar
    post_item['score'] = score
    post_item['cook'] = cook
anaconda安装 mysqlclient
conda install mysqlclient
准备工作就绪后,开始写sqlpipeline
pipelines.py
+ import MySQLd
...

+ class MysqlPipelin(object):
+
+     def __init__(self):
+         self.conn = MySQLdb.connect('host','user','password','dbname',charset='utf8',use_unicode=True)
+         self.cursor = self.conn.cursor()
+
+     def process_item(self,item,spider):
+         insert_sql = """
+             INSERT INTO post(`post_id`,`post_url`,`title`,`cover`,`front_image_url`,`author`,`avatar`,`score`,`cook`)
+             VALUES (%s, %s, %s, %s, %s, %s,%s,%s,%s)
+         """
+         self.cursor.execute(insert_sql,(item['post_id'],item['post_url'],item['title'],item['cover'],item['front_image_url'],item+ ['author'],item['avatar'],item['score'],item['cook']))
+         self.conn.commit()
激活MysqlPipelin,修改settings.py
ITEM_PIPELINES = {
   'xiachufang.pipelines.XiachufangPipeline': 300,
   # 'scrapy.pipelines.images.ImagesPipeline': 1
   'xiachufang.pipelines.PostImagePipeline': 1,
   # 'xiachufang.pipelines.JsonWithEncodingPipeline': 2,
   # 'xiachufang.pipelines.JsonExporterPipeline': 2,
+   'xiachufang.pipelines.MysqlPipelin': 2,
}
重启main.py,检查数据表中是否添加进数据
11.scrapy数据库异步插入
上面自己写的数据库插件时一个同步插入,下面介绍下如何异步插入数据
数据库配置放在settings.py
在settings.py最下面定义好数据库配置
MYSQL_HOST = 'host'
MYSQL_USER = 'user'
MYSQL_PASS = 'pass'
MYSQL_DB   = 'dbname'
pipelines.py 新建MysqlTwistedPipeline
+ import MySQLdb
+ import MySQLdb.cursors
+ from twisted.enterprise import adbapi

+class MysqlTwistedPipeline(object):
+
+    def __init__(self, dbpool):
+        self.dbpool = dbpool
+
+    @classmethod
+    def from_settings(cls, settings):
+        myparms = dict(
+            host = settings['MYSQL_HOST'],
+            db = settings['MYSQL_DB'],
+            user = settings['MYSQL_USER'],
+            passwd = settings['MYSQL_PASS'],
+            charset = 'utf8',
+            cursorclass = MySQLdb.cursors.DictCursor,
+            use_unicode = True
+        )
+
+        dbpool = adbapi.ConnectionPool("MySQLdb", ** myparms)
+        return cls(dbpool)
+
+    def process_item(self,item,spider):
+        query = self.dbpool.runInteraction(self.do_insert, item)
+        query.addErrback(self.handle_error, item, spider)
+
+    #处理异常
+    def handle_error(self,failure,item,spider):
+        print(failure)
+
+    def do_insert(self, cursor, item):
+        insert_sql = """
+            INSERT INTO post(`post_id`,`post_url`,`title`,`cover`,`front_image_url`,`author`,`avatar`,`score`,`cook`)
+            VALUES (%s, %s, %s, %s, %s, %s,%s,%s,%s)
+        """
+        cursor.execute(insert_sql,(item['post_id'],item['post_url'],item['title'],item['cover'],item['front_image_url'],item['author'],+item['avatar'],item['score'],item['cook']))
+
settings.py 激活MysqlTwistedPipeline
ITEM_PIPELINES = {
   'xiachufang.pipelines.XiachufangPipeline': 300,
   # 'scrapy.pipelines.images.ImagesPipeline': 1
   'xiachufang.pipelines.PostImagePipeline': 1,
   # 'xiachufang.pipelines.JsonWithEncodingPipeline': 2,
   # 'xiachufang.pipelines.JsonExporterPipeline': 2,
   # 'xiachufang.pipelines.MysqlPipelin': 2,
   'xiachufang.pipelines.MysqlTwistedPipeline': 2,
}
完成后重新启动main.py,在post数据表中可以看到数据保存进来了
小菜在控制台中看到了一个报错
ValueError: invalid literal for int() with base 10: '7.3'
我们在爬取score字段时,将强制转成int类型,在实际中,分数是一个小数float类型,所以将xcf.py文件中score类型改成float就可以了
+ score = float(response.css('.main-panel .score .number::text').get(default=0))
到这里将数据存储到数据库就完成了,其实可以用ORM将数据存放在数据库。
12.Item Loader
Items 提供保存抓取数据的容器,而Item Loaders 提供的是填充容器的机制。
Item Loaders提供的是一种灵活,高效的机制,可以更方便的被 spider 或 source format (HTML,XML,etc)扩展,并 override 更易于维护的、不同的内容分析规则。现在我们来使用一下item loader
修改 xcf.py
+ from scrapy.loader import ItemLoader

- def parse_detail(self,response):
-     #实例化XiachufangItem
-     post_item = XiachufangItem()
-
-     #获取文章内的参数
-     post_url = response.url
-     title = response.css('.main-panel h1.page-title::text').get().strip()
-     cover = response.css('.main-panel .cover img::attr(src)').get()
-     author = response.css('.main-panel .author span[itemprop="name"]::text').get()
-     avatar = response.css('.main-panel .author img::attr(src)').get()
-     score = float(response.css('.main-panel .score .number::text').get(default=0))
-     cook = int(response.css('.main-panel .cooked .number::text').get(default=0))
-
-     #将值填充到Item
-     post_item['post_url'] = post_url
-     post_item['post_id'] = get_md5(post_url)
-     post_item['title'] = title
-     post_item['cover'] = [cover]
-     post_item['author'] = author
-     post_item['avatar'] = avatar
-     post_item['score'] = score
-     post_item['cook'] = cook
-
-     #返回设置后item
-     yield post_item

+ def parse_detail(self,response):
+    l = ItemLoader(item= XiachufangItem(), response=response)
+    l.add_value('post_url', response.url)
+    l.add_css('post_id', get_md5(response.url))
+    l.add_css('title', '.main-panel h1.page-title::text')
+    l.add_css('cover', '.main-panel .cover img::attr(src)')
+    l.add_css('author', '.main-panel .author span[itemprop="name"]::text')
+    l.add_css('avatar', '.main-panel .author img::attr(src)')
+    l.add_css('score', '.main-panel .score .number::text')
+    l.add_css('cook', '.main-panel .cooked .number::text')

+    l = l.load_item()
+    yield l
重启main.py在parse()内部打个断点
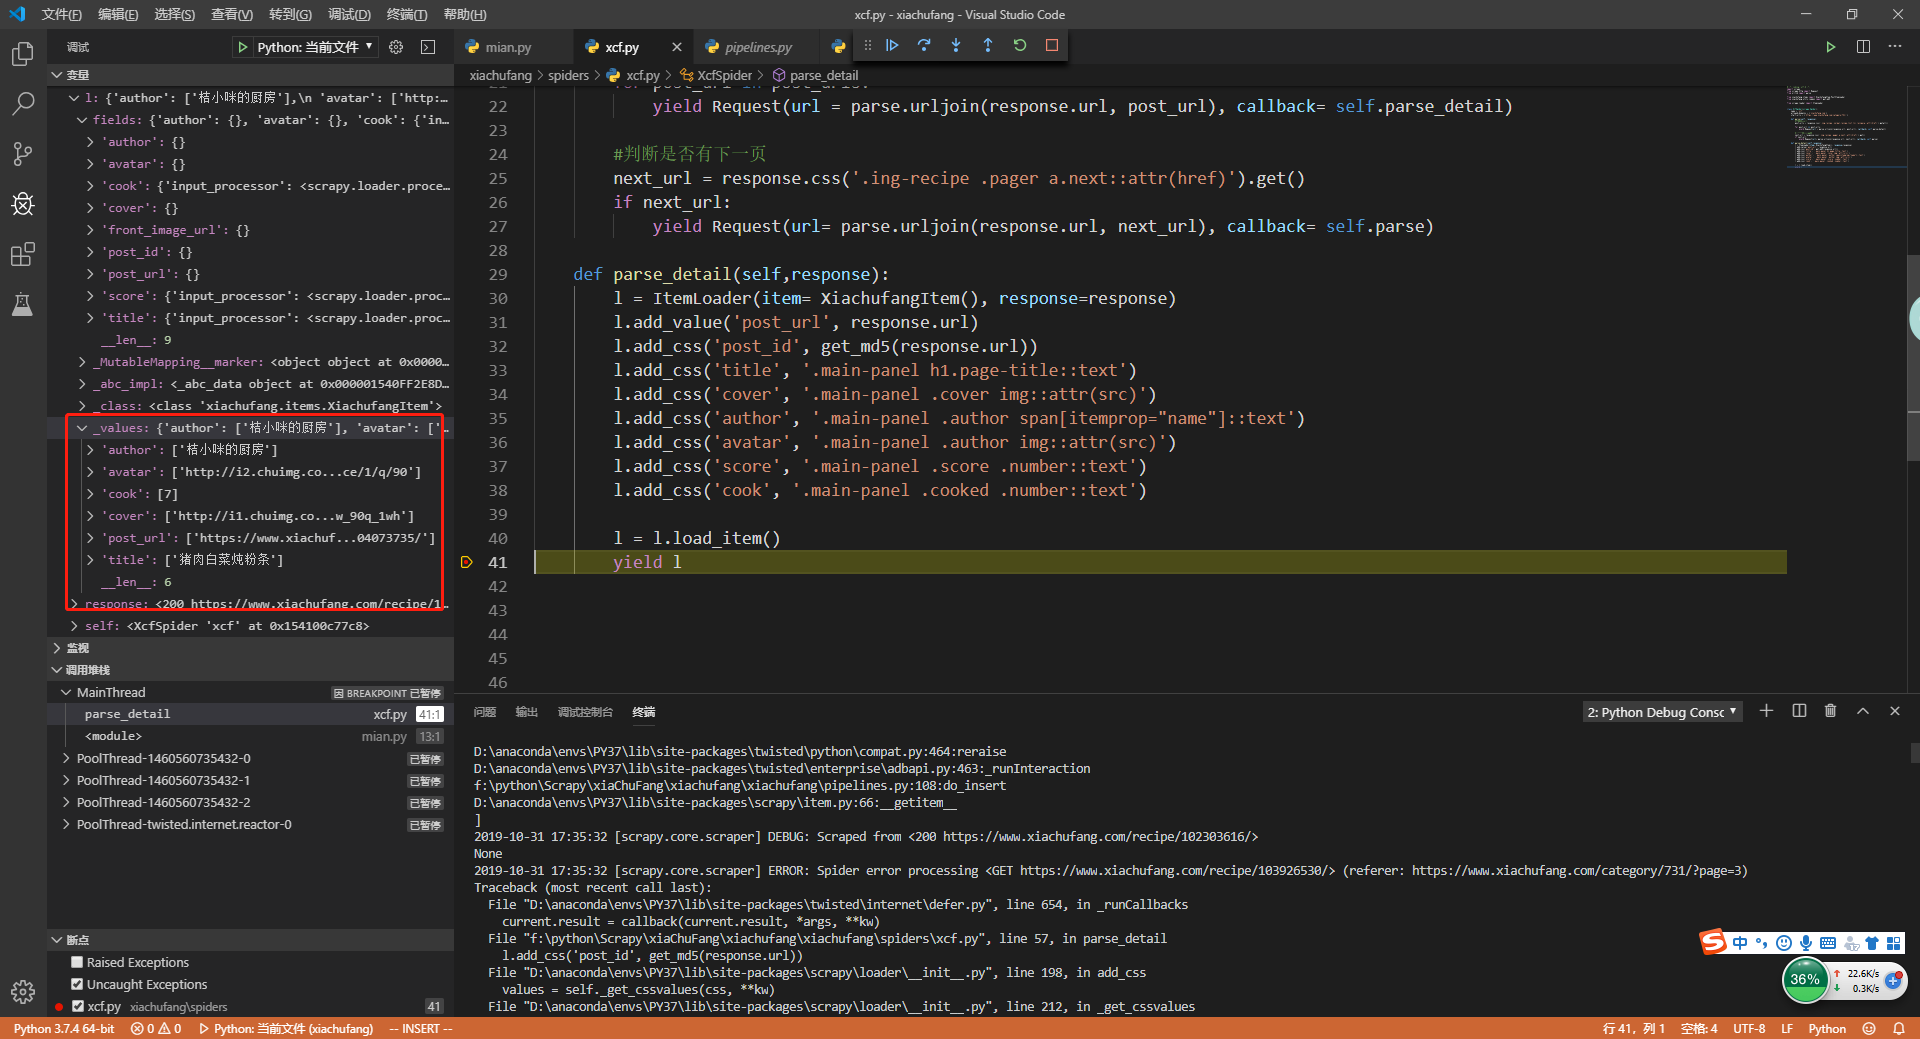
这样是不是代码精简了许多,但是也会带来一些问题,比如之前我们匹配完title,发现title中间是有空格的,使用strip()将title中的空格去掉,现在好像去不掉。别着急,如果我们需要对数据做进一步处理就需要到items.py中去处理。
注意:收集的数据在内部存储为列表,从而可以将多个值添加到同一字段。如果在创建加载程序时传递了item参数,则每个项目的值(如果已经是可迭代的)都将原样存储,或者如果为单个值则用列表包装。
13.item中处理数据
items.py
开始之前,建议小伙伴们先看下官方文档item loaders
每个scrapy.Field()都可以接受两个值input_processor和output_processor
import scrapy

from scrapy.loader import ItemLoader
from scrapy.loader.processors import Join, MapCompose, TakeFirst


def deal_title_strip(title):
    title = title.strip()
    return title

def score_conversion_type(score):
    score = score if score else 0
    return float(score)

def cook_converion_type(cook):
    cook = cook if cook else 0
    return int(cook)


class PostItemLoader(ItemLoader):
    default_output_processor = TakeFirst()

class XiachufangItem(scrapy.Item):

    post_url = scrapy.Field()
    post_id = scrapy.Field()
    title = scrapy.Field(
        input_processor = MapCompose(deal_title_strip)
    )
    cover = scrapy.Field()
    front_image_url = scrapy.Field()
    author = scrapy.Field()
    avatar = scrapy.Field()
    score = scrapy.Field(
        input_processor = MapCompose(score_conversion_type)
    )
    cook = scrapy.Field(
        input_processor = MapCompose(cook_converion_type)
    )
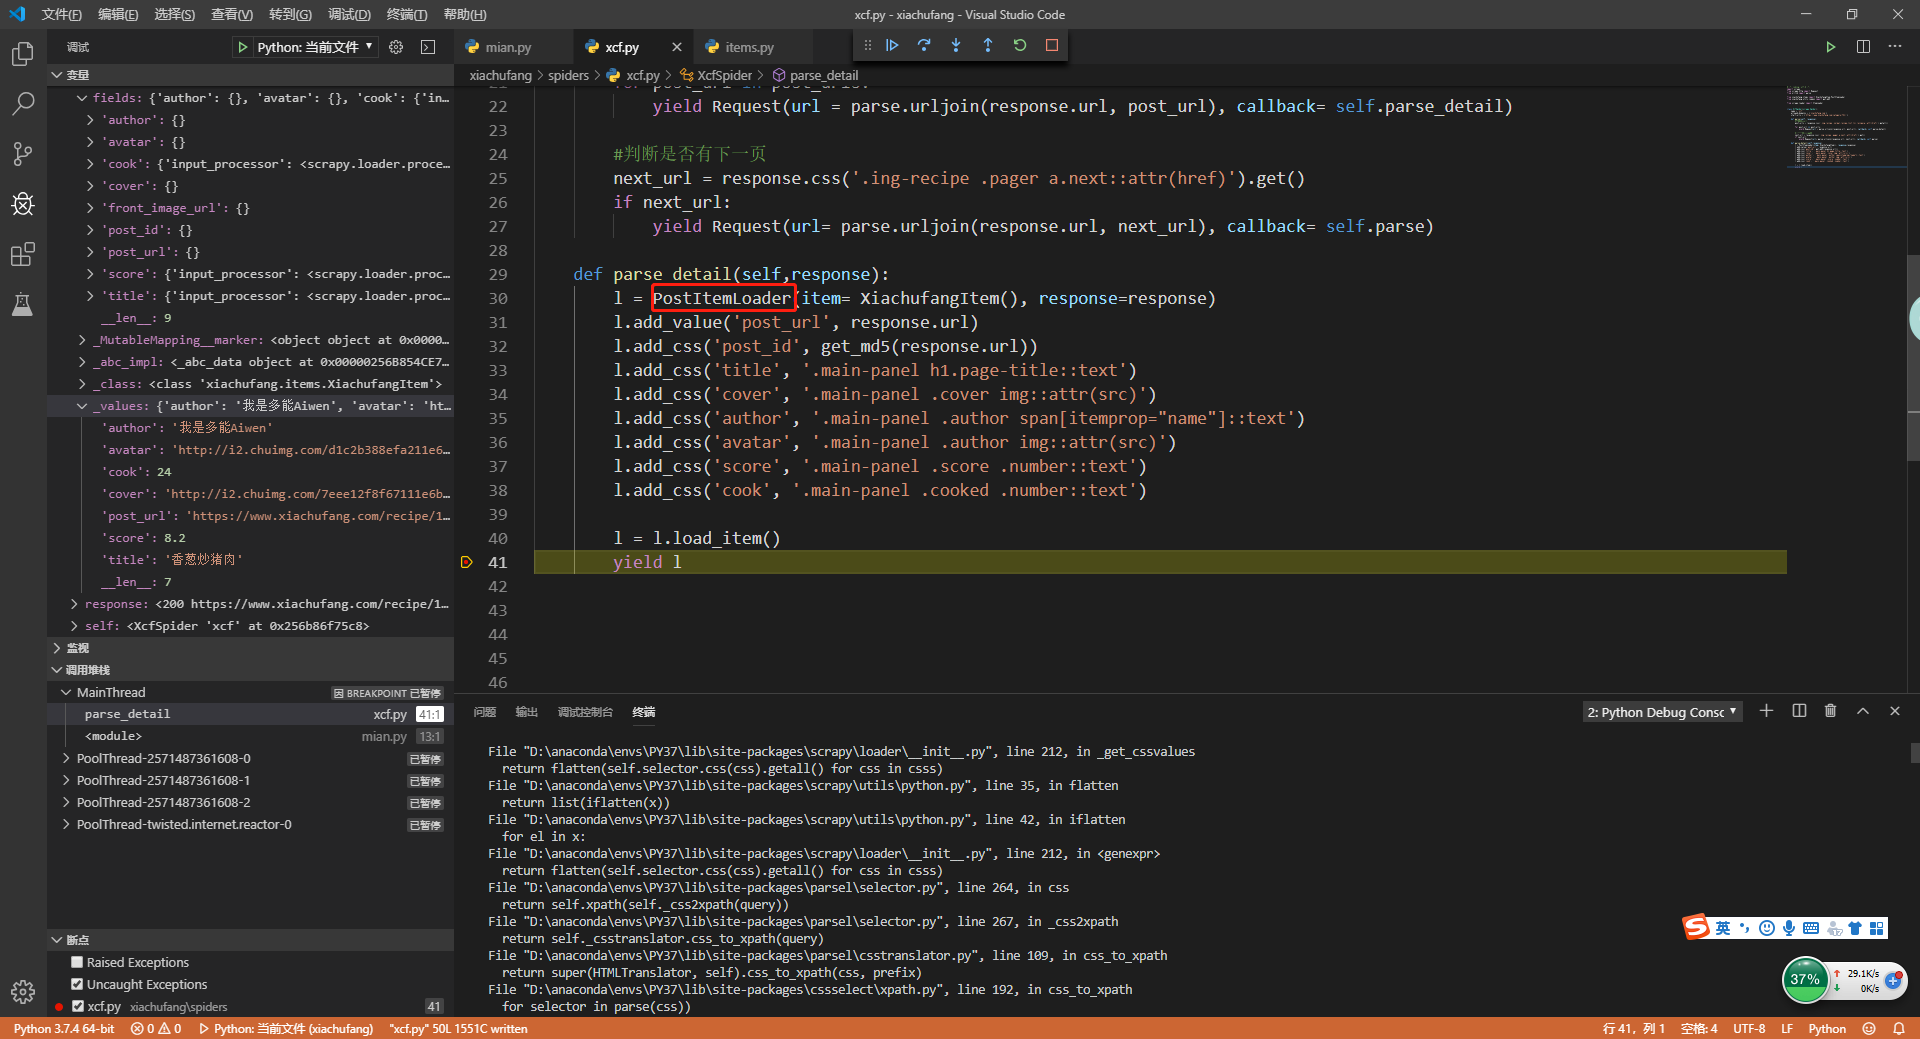
再修改xcf.py
+ from xiachufang.items import XiachufangItem,PostItemLoade

def parse_detail(self,response):
+    l = PostItemLoader(item= XiachufangItem(), response=response)
    l.add_value('post_url', response.url)
    l.add_css('post_id', get_md5(response.url))
    l.add_css('title', '.main-panel h1.page-title::text')
    l.add_css('cover', '.main-panel .cover img::attr(src)')
    l.add_css('author', '.main-panel .author span[itemprop="name"]::text')
    l.add_css('avatar', '.main-panel .author img::attr(src)')
    l.add_css('score', '.main-panel .score .number::text')
    l.add_css('cook', '.main-panel .cooked .number::text')

    l = l.load_item()
    yield
然后重启main.py,看到我们之前处理的数据格式又回来了。
14.总结
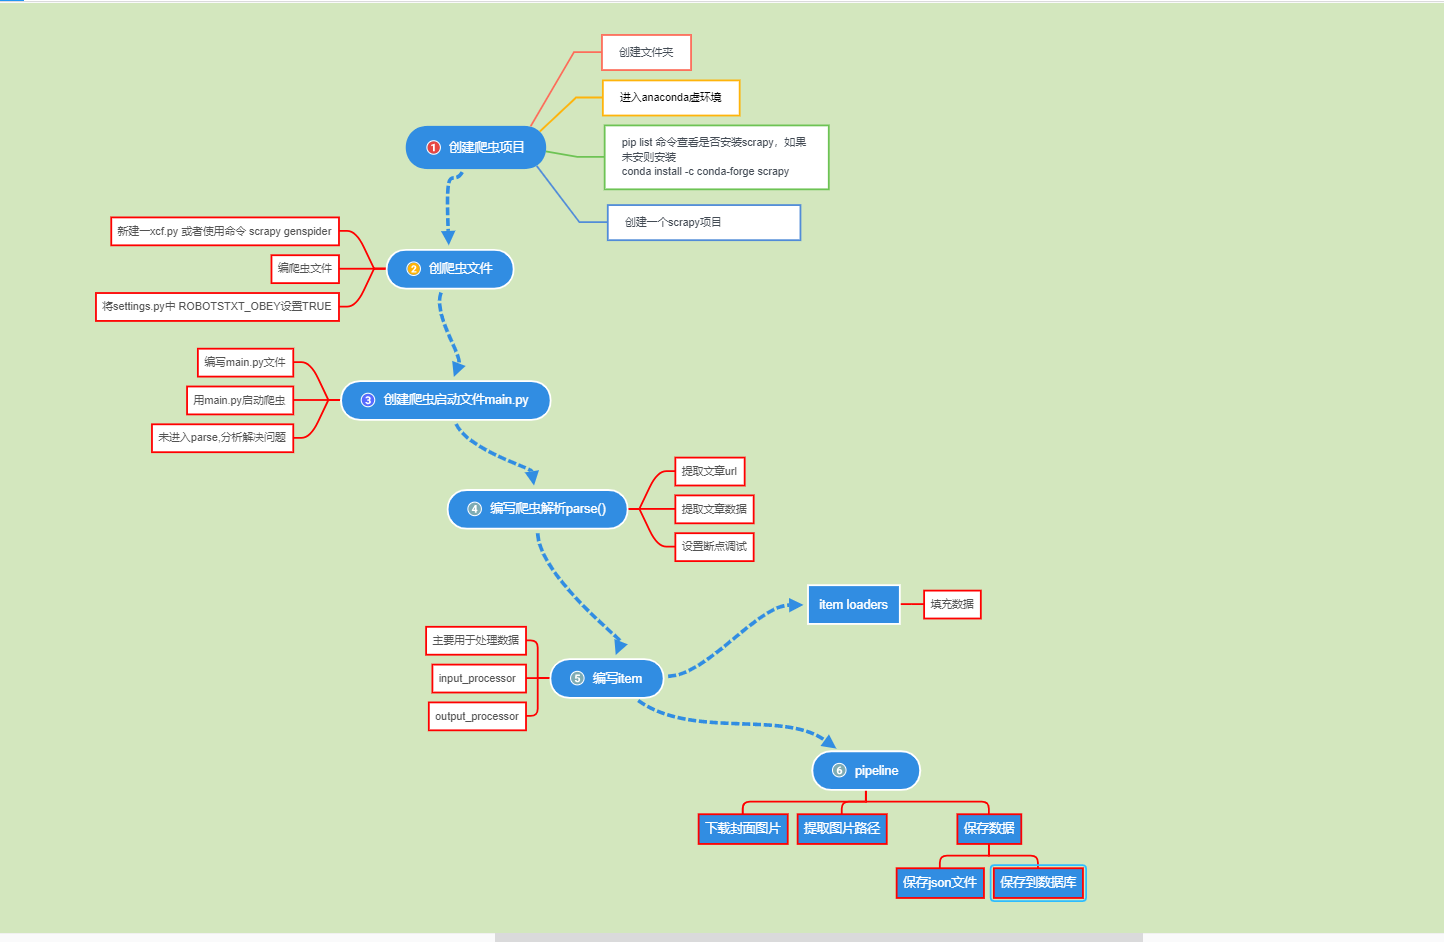
至此到这里就结束了,最后放上一张流程图来将整个流程总结一遍。图画的比较突兀,大家体谅一下